> ## Documentation Index
> Fetch the complete documentation index at: https://docsv4.mile.app/llms.txt
> Use this file to discover all available pages before exploring further.
# How to Use Routing
> Connect task data to routing, then plan by zone, by priority, for pickup and delivery, for cold chain, and add tasks without disturbing dispatched routes.
This page shows how to get the most out of routing: how to connect your task data to routing with the task type's **Route** mapping, and how to model common situations: planning by zone, prioritizing visits, pickup and delivery, adding tasks to routes already on the road, and cold chain delivery.
If you are new to routing, start with the [Introduction](/pages/planning/routing/introduction).
## Connecting task data to routing
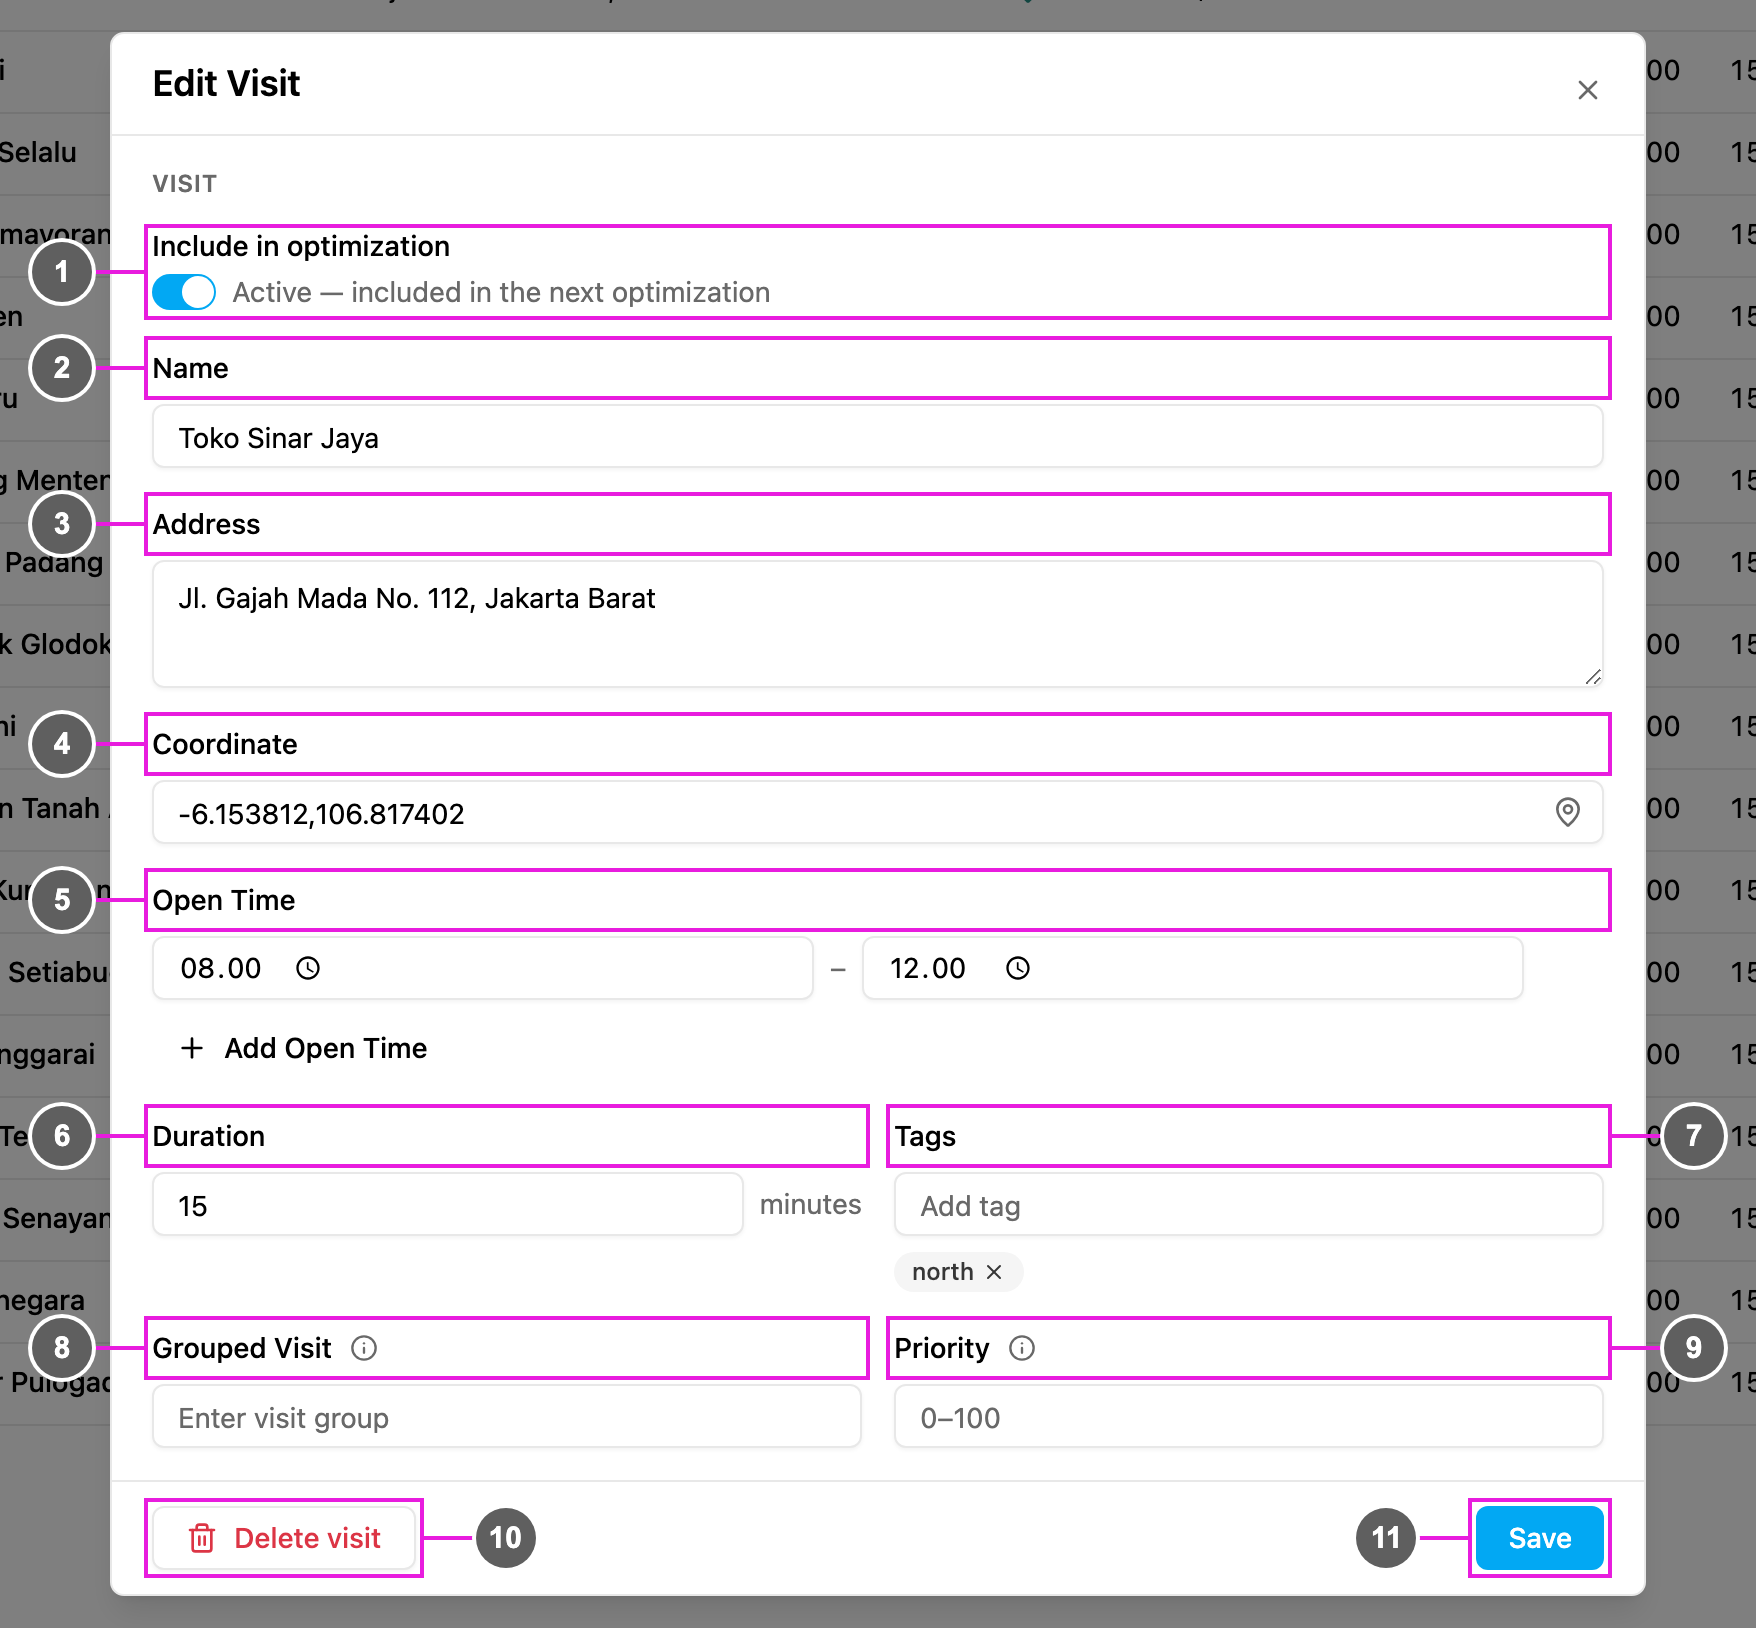
When a task is created (on the web app, in the field app, by import or by API), routing does not know which field is the address, the open time or the weight. The **Route** mapping of the task type tells it: it links each routing field to a component on the task type's **Initial page**.
Once mapped, every new task of that task type appears on the [Visit](/pages/planning/routing/visit) page with its routing fields filled in, so you do not type the visit data before each optimization.
Required permission:
* View flow
* Edit flow
To set the mapping:
1. Open **Workflow › Task Type** and open the task type you use for routing.
2. Open the **Configuration** tab and go to **Route**.
3. For each routing field, pick the matching component. Only components on the Initial page can be picked.
4. Click **Save**.
See [Task type configuration › Route](/pages/workflow/task-type/configuration#route) for the screen.
### Fields you can map
| Field | What it controls | Component |
| - | - | - |
| **Visit Name** | The visit's name, usually the customer or store name. | Text |
| **Address** | The address. Used to find the location when there is no coordinate. | Text, Address |
| **Coordinate** | The latitude and longitude of the visit. | Coordinate |
| **Open Time** (start and end) | The visit's time window. Up to three windows. | Time |
| **Visit Duration** | Minutes spent at the visit. | Number (whole) |
| **Tag** | Tags that match the visit with vehicles. | Text, Select |
| **Grouped Visit** | Visits with the same value go on the same vehicle. See [Visit Group](/pages/planning/routing/configuration/visit-group). | Text |
| **Priority** | The order inside a visit group, 0 to 100; a lower number goes first. Leave it empty if you do not need an order. | Number |
| **Constraint …** | One row per [capacity constraint](/pages/planning/routing/configuration/capacity-constraint), such as weight or volume. | Number, Currency |
A field you do not map is simply empty for tasks of that task type. You can still fill it in on the Visit page before optimizing, but those values are temporary and are not saved to the task.
## Use cases
### 1. Planning by zone with visit and vehicle tags
When some vehicles may only serve some areas, for example a fleet split into **north** and **south**, combine three things:
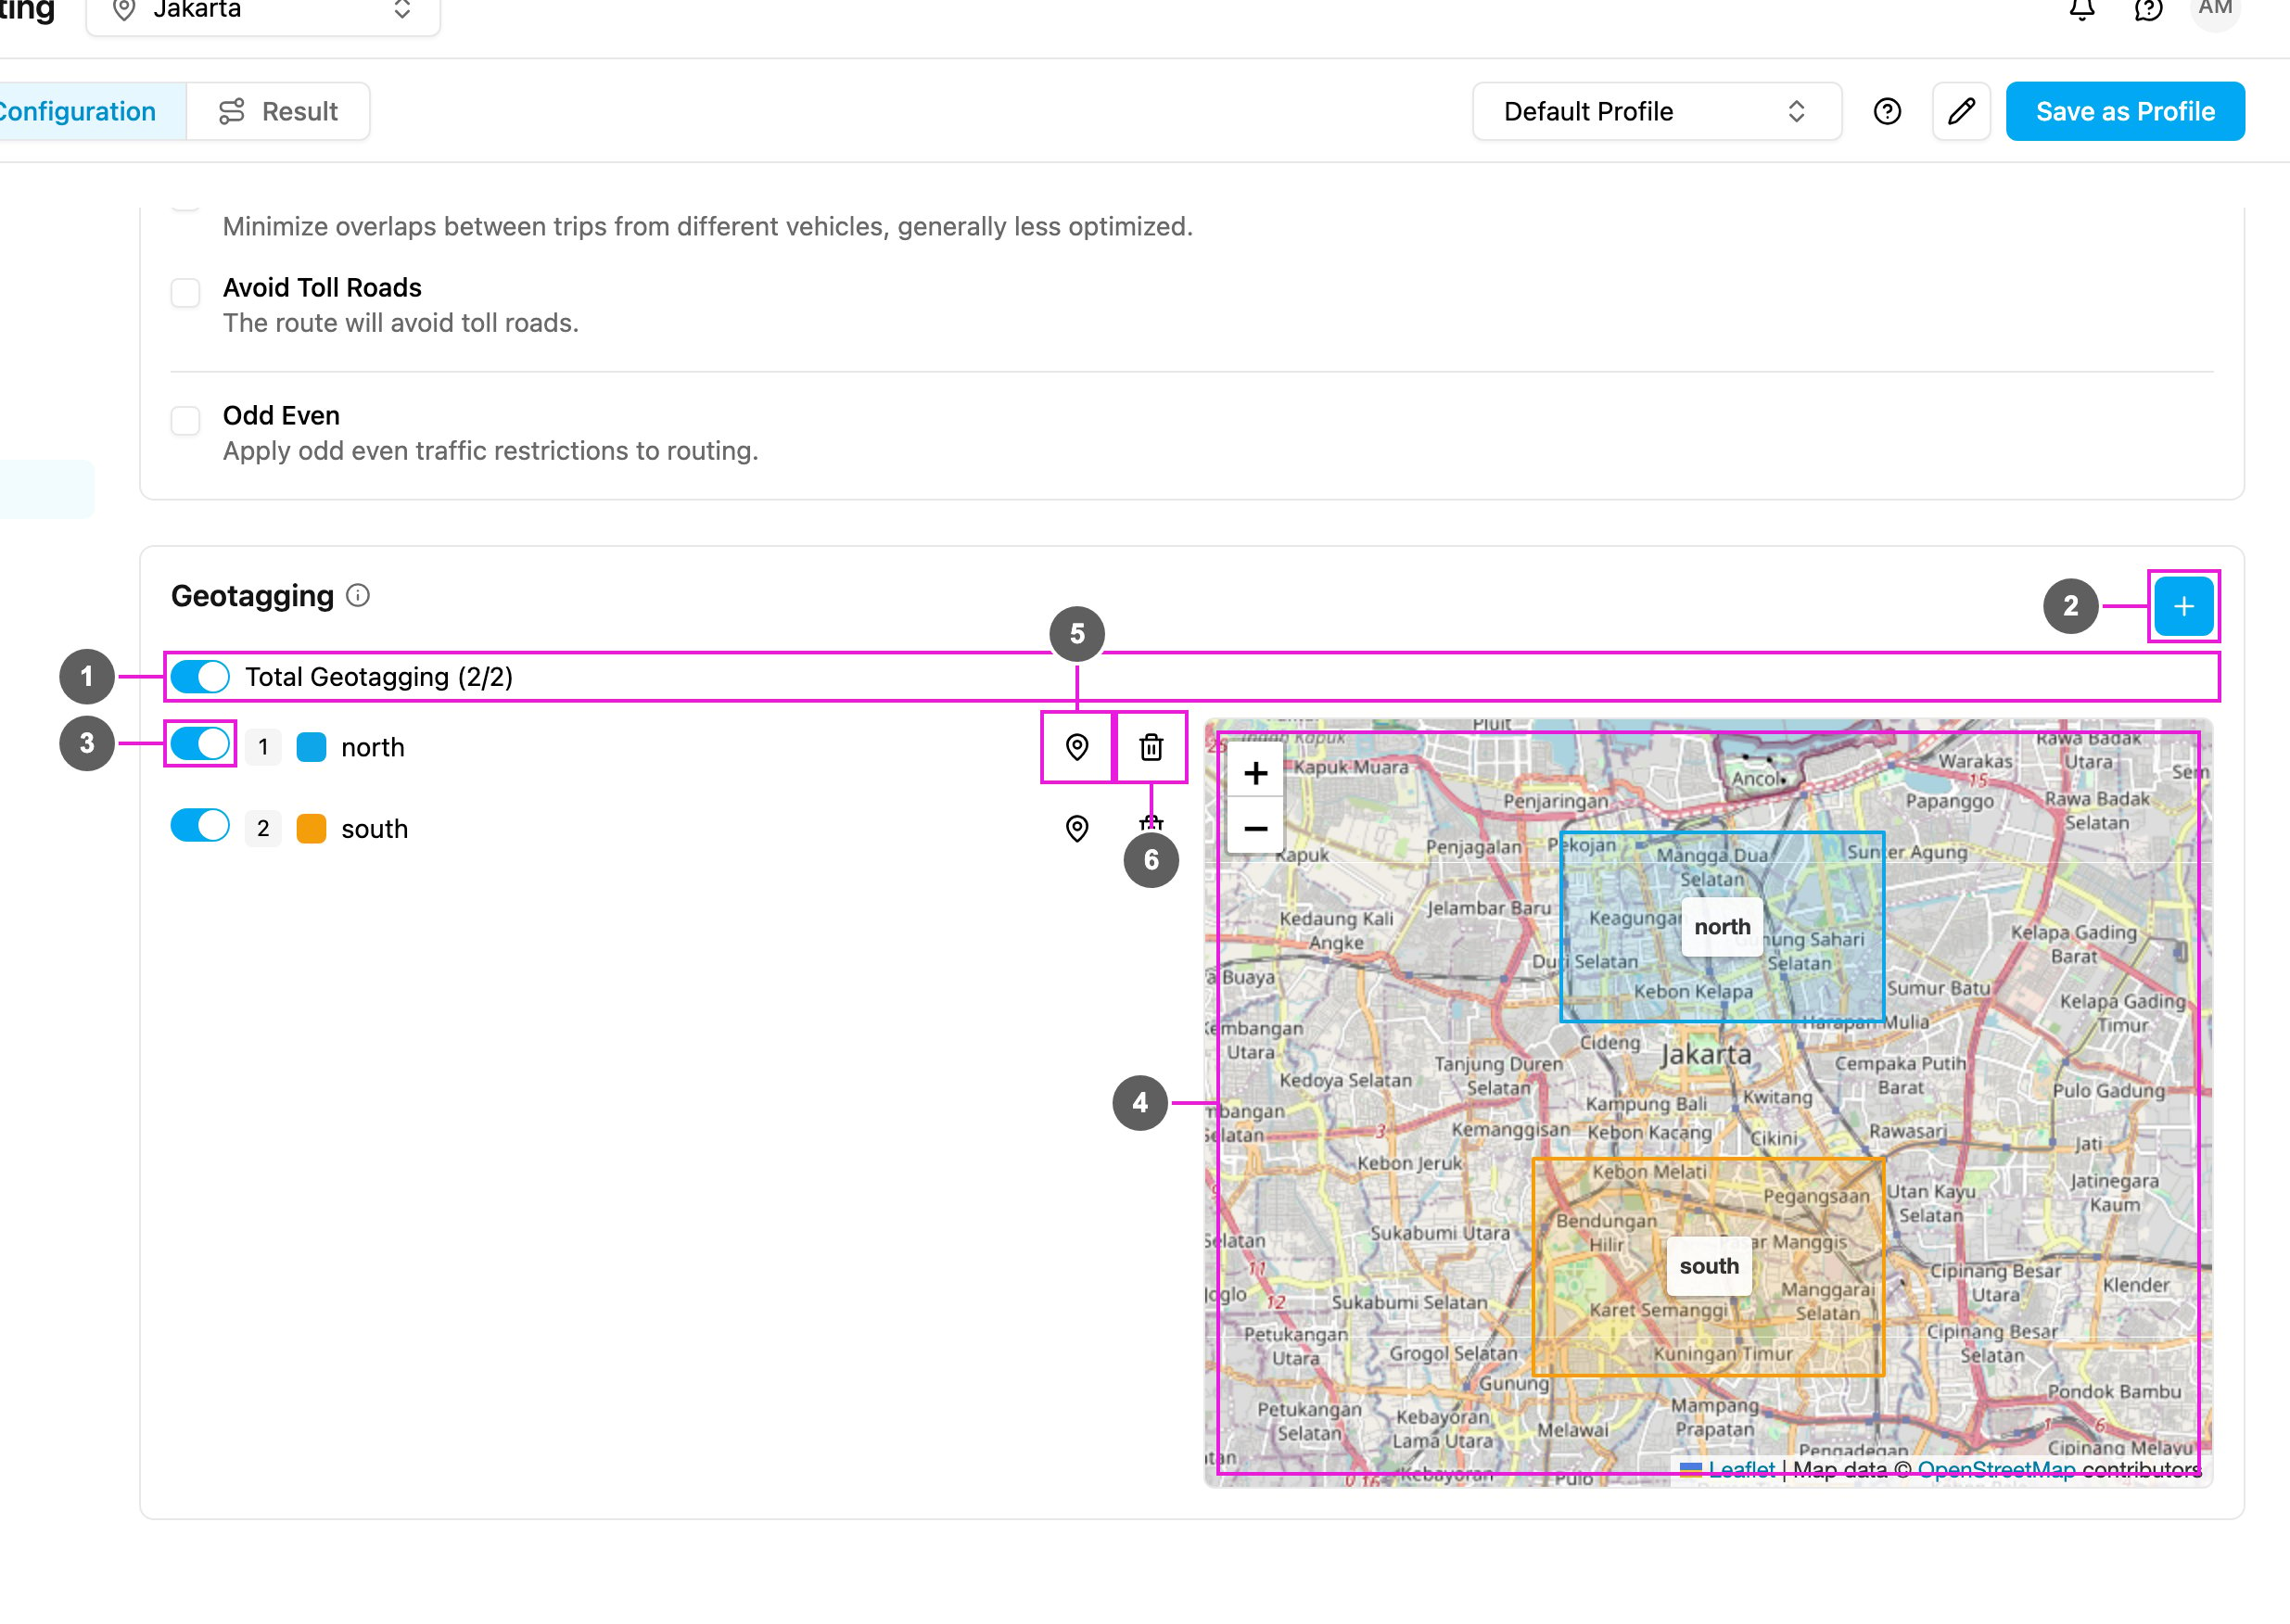
* **Geotagging**: draw an area on the map for each zone. Visits inside get the zone's tag automatically. See [Geotagging](/pages/planning/routing/configuration/geotagging).
* **Visit tag**: the tag on the visit, typed by hand or added by geotagging.
* **Vehicle tag**: the tags on each vehicle, saying which zones it may serve.
How matching works:
* A visit with tags is only served by a vehicle that has all of those tags.
* A visit without tags can be served by any vehicle.
Setup:
1. In **Planning › Routing › Configuration › Geotagging**, click **+**, name the zone (for example `south`) and draw its area on the map.
2. In **Vehicles**, give the same tag to every vehicle of that zone.
3. Optimize. Visits and vehicles are matched by their tags.
### 2. Prioritizing visits
Some visits must come first: a visit with a narrow window, or one that must happen before another. There are two ways:
**Time window: when the visit can be served.** If a customer can only be served from 06:00 to 08:00, set the visit's **Open Time** to 06:00 – 08:00. The time window is a hard rule: the visit is never planned outside it.
**Priority: which visit comes first.** A time window only says when a visit *can* happen, not which comes first. For a real order, for example "serve this before the other visits in its group", use **Priority**:
* Priority is a whole number from 0 to 100.
* A lower number goes first.
* Visits without a value count as 0.
Setup:
1. Set the visit's **Open Time** if it must fall in a window, for example 06:00 – 08:00.
2. Give the visits that must go first a low **Priority**.
3. Put related visits in the same **Grouped Visit** so the priority applies inside that group. See [Visit Group](/pages/planning/routing/configuration/visit-group).
### 3. Pickup and delivery
When an order means picking goods up in one place and dropping them in another, both stops must be served by the same vehicle, pickup first. Use **Grouped Visit**, **Priority** and capacity values with a sign:
| Field | Pickup visit | Delivery visit |
| - | - | - |
| **Grouped Visit** | the same value, for example `clothing-order-42` | the same value, for example `clothing-order-42` |
| **Priority** | `1` | `2` |
| **Weight** (or another capacity) | `+100` (loaded) | `-100` (unloaded) |
Setup:
1. Give both visits the same **Grouped Visit**, for example `clothing-order-42`.
2. Set **Priority** `1` on the pickup and `2` on the delivery. The pickup is planned first because a lower number goes first.
3. Set the capacity to a **positive** value on the pickup and the same **negative** value on the delivery. The load on board goes up at the pickup and back down at the delivery. On the result map and Gantt, a down arrow marks negative capacity.
#### Case study: mixed pickup and delivery
A logistics company runs a vehicle that leaves the warehouse with 5 parcels for morning deliveries. Mid-morning, the dispatcher gets 2 pickups from a vendor that must come back to the warehouse the same day.
Without modeling pickups and deliveries together, the dispatcher would have to decide by hand which driver collects the pickups, guess whether the vehicle still has room, and hope the driver does the pickup before the related delivery.
With the pattern above (same group, priority `1`/`2`, `+`/`-` weight), routing handles it:
| Concern | What routing does |
| - | - |
| The right driver picks up | Pickup and delivery share a group, so the same vehicle does both. |
| Never deliver before picking up | Priority `1` on the pickup puts it before the delivery (`2`). |
| Stay within capacity | The load goes up at the pickup and down at the delivery. |
| No empty trips | The pickups are fitted into the existing route instead of a separate run. |
The dispatcher enters the data once, and gets one mixed route that respects order, capacity and vehicle.
### 4. Adding a task without changing routes on the road
After you optimize and [dispatch](/pages/planning/routing/result/dispatch) a result, every planned visit shows a **truck icon** on the Visit page (hover it to see the vehicle). It means the visit is already on a route that a driver is driving.
When a new task comes in later in the day, you don't need to plan everything again. Visits with a truck icon keep their vehicle when you optimize again; only the new visits are placed. See [Dynamic routing](/pages/planning/routing/introduction#dynamic-routing).
1. Create the new task, with its data complete: name, address, coordinate, open time, and tags if needed.
2. On the Visit page, check the visits: those with a truck icon are already on a route; the new one has no icon yet.
3. Click **Optimize** again. Dispatched visits stay on their vehicles and the new visit goes where it fits best.
4. Check the result and dispatch it.
This way you can keep adding tasks through the day without disturbing routes already on the road.
### 5. Cold chain: temperature-controlled delivery
Cold chain deliveries (frozen and chilled food, fresh produce, medicines) add two hard requirements to a normal route: the goods must travel on a **refrigerated vehicle**, and they must arrive **within a tight time window** before they warm up. You model both with what you have already seen:
| Requirement | Feature | Setup |
| - | - | - |
| Only refrigerated vehicles serve these visits | Visit tag + vehicle tag | Tag the cold chain visits (for example `frozen`) and give the same tag **only** to refrigerated vehicles. |
| Stay within the chilled capacity | Capacity constraint | Add a constraint (for example `chilled_volume`), set each visit's load and each vehicle's maximum. |
| Deliver before the goods warm up | Open time | Set the visit's delivery window. It is a hard rule: the visit is never planned outside it. |
| Keep handling time realistic | Visit duration | Set the minutes needed to unload safely. |
Cold chain routing needs no special feature: it combines tag matching, a capacity constraint and time windows. Map these fields in the task type's [Route mapping](#connecting-task-data-to-routing) so every cold chain task is ready to optimize.
**Temperature readings in transit**: a telematics or IoT device on the refrigerated vehicle can send readings such as temperature, engine status or door status with each location record through the Location History API (the free-form `data` object of the record, for example `"data": { "temperature": 4, "engine": "on", "status": "safe" }`). Use whatever keys fit your operation, and send a new record on each interval so the values stay current. Routing plans and orders the route; the readings come from the device, not from the task type.
#### Case study: frozen food distributor
A distributor delivers frozen goods across the city from one cold-storage warehouse. It has three needs a normal route cannot express:
* Only 2 of its 5 vehicles are refrigerated, so frozen orders must never go on a dry truck.
* Each refrigerated vehicle has a limited chilled compartment.
* Every customer has a morning delivery window.
With a `frozen` tag on the visits and the refrigerated vehicles, a `chilled_volume` capacity constraint and delivery windows, routing handles all three:
| Concern | What routing does |
| - | - |
| Frozen goods only on refrigerated vehicles | Tag matching puts `frozen` visits only on vehicles with the same tag. |
| Never overload the cold compartment | The capacity constraint limits each vehicle's chilled load; extra visits are split or dropped. |
| Deliver within the safe window | The time window is a hard rule. |
The dispatcher plans one set of routes that respects vehicle type, capacity and delivery windows.
## Frequently asked questions
**Do I have to map every field in Route?**
No. Map only the fields you want filled in automatically. You can fill in the others on the Visit page before optimizing.
**What if a visit has a tag that no vehicle has?**
The visit is not given to any vehicle and appears in the dropped visits. See [Dropped Visit](/pages/planning/routing/result/dropped-visit).
**Can two visits of the same group go on different vehicles?**
No. All visits of a group go on the same vehicle.
**Does Priority work without a visit group?**
Priority matters most inside a group. Without a group, the visit is planned according to its time window and the overall route cost. For a strict order, use a group together with Priority.
**Will optimizing again after dispatch change routes already on the road?**
No. Visits with a truck icon keep their vehicle; only new visits are placed.
**How do I make sure frozen orders only go on refrigerated vehicles?**
Give the same tag (for example `frozen`) to the cold chain visits and only to the refrigerated vehicles. Add a capacity constraint for the chilled compartment and a time window for the delivery. See [Cold chain](#5-cold-chain-temperature-controlled-delivery).
## Related
* [Introduction](/pages/planning/routing/introduction)
* [Visit](/pages/planning/routing/visit)
* [Geotagging](/pages/planning/routing/configuration/geotagging)
* [Visit Group](/pages/planning/routing/configuration/visit-group)
* [Capacity Constraint](/pages/planning/routing/configuration/capacity-constraint)
* [Dispatch](/pages/planning/routing/result/dispatch)
* [Dropped Visit](/pages/planning/routing/result/dropped-visit)
* [Task type configuration](/pages/workflow/task-type/configuration)
This documentation is built and hosted on [Mintlify](https://mintlify.com), a developer documentation platform.