> ## Documentation Index
> Fetch the complete documentation index at: https://docsv4.mile.app/llms.txt
> Use this file to discover all available pages before exploring further.
# Vehicle
> Add, edit, select and delete the vehicles routing plans with.
A **vehicle** is a car, motorbike, truck or any other transport your field users drive. Each vehicle has its own working time, break time, speed, cost and capacity, and can be given a driver (assignee).
In v4 the vehicles are managed in **Planning › Routing › Configuration**, in the **Vehicles** section. The vehicle list belongs to the hub picked at the top of the page: every configuration profile of that hub shares the same vehicles, but each profile chooses which of them to use.
Required permission:
* View vehicle
* Create vehicle (add vehicles)
* Edit vehicle (edit a vehicle)
* Delete vehicle (delete one or all vehicles)
## Vehicle table
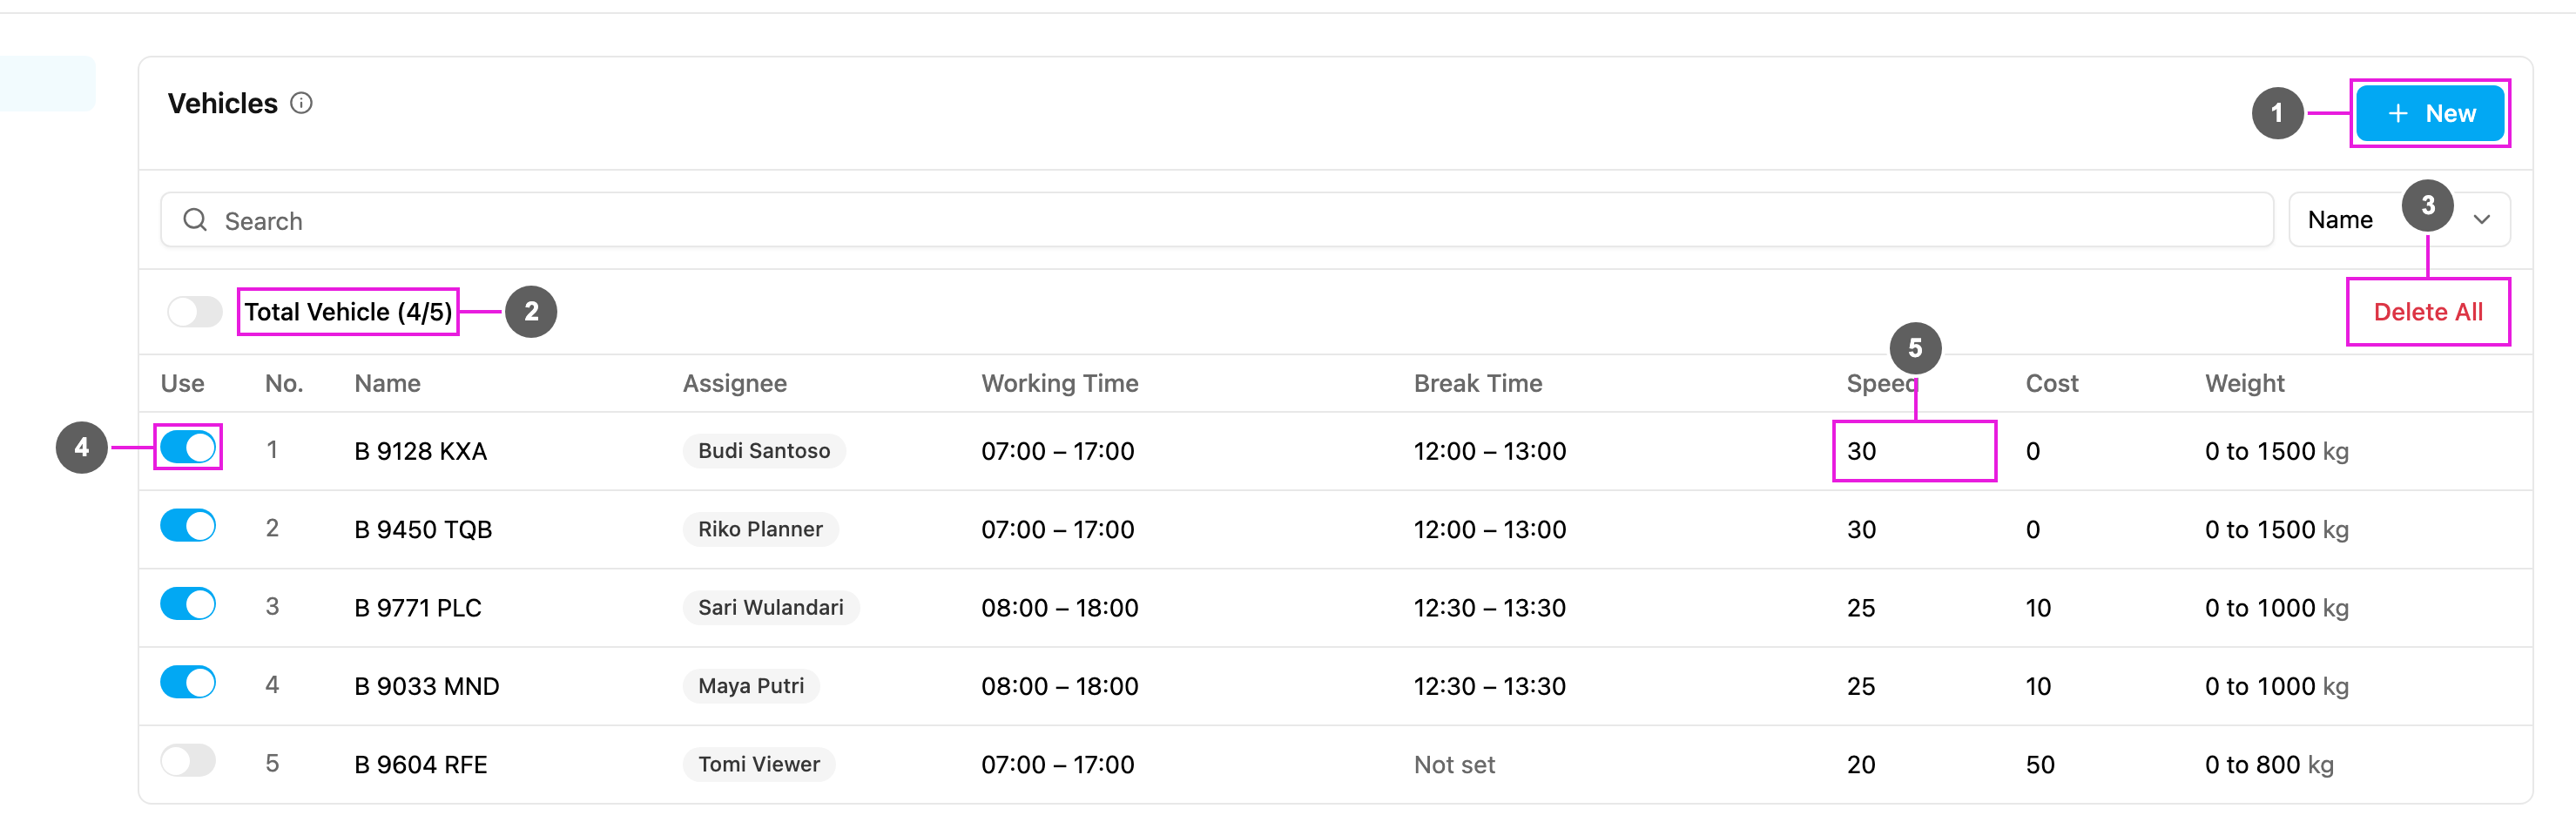
1. **New**: add vehicles. See [Creating vehicles](#creating-vehicles).
2. **Total Vehicle**: how many vehicles are used by this profile out of all the hub's vehicles, for example **Total Vehicle (4/5)**. The switch next to it selects or unselects all of them.
3. **Delete All**: delete every vehicle of the hub. See [Deleting vehicles](#deleting-vehicles).
4. **Use**: switch a vehicle on to send it to the optimization with this profile. Switched-off vehicles stay in the list but are not planned.
5. **Speed**: click a value in the table to change it in place. Name, assignee, working time, break time, speed, cost, capacity and tags can all be changed this way.
Type in **Search** above the table to find a vehicle. The list next to it chooses whether the search looks at the **Name** or the **Tag**. The table also lists vehicles of the sub hubs used by [Cross Docking](/pages/planning/routing/configuration/cross-docking).
The table has these columns:
| Column | What it shows |
| - | - |
| **Use** | Whether this profile uses the vehicle. |
| **No.** | The vehicle's position in the list. |
| **Name** | The vehicle name, often its plate number, for example **B 9128 KXA**. |
| **Assignee** | The driver who gets the vehicle's visits as tasks when you dispatch. **Unassigned** when nobody is set; you can also choose the driver later on the result. |
| **Type** | **Any**, **Odd** or **Even** plate. Only shown when [Odd Even](/pages/planning/routing/configuration/odd-even) is on. |
| **Working Time** | When the vehicle may work, for example **07:00 – 17:00**. |
| **Break Time** | The vehicle's break, for example **12:00 – 13:00**, or **Not set**. |
| **Speed** | Average speed in km/h. Locked when **Auto Speed** is on. |
| **Cost** | The cost factor, 0 to 100. |
| **Weight** (one column per capacity) | The minimum and maximum capacity, for example **0 to 1500 kg**. There is one column for each [capacity constraint](/pages/planning/routing/configuration/capacity-constraint) ticked in the profile, so the columns change when you tick or untick a constraint. |
| **Tags** | The vehicle tags, or **None**. |
| **Action** | Edit and delete icons. |
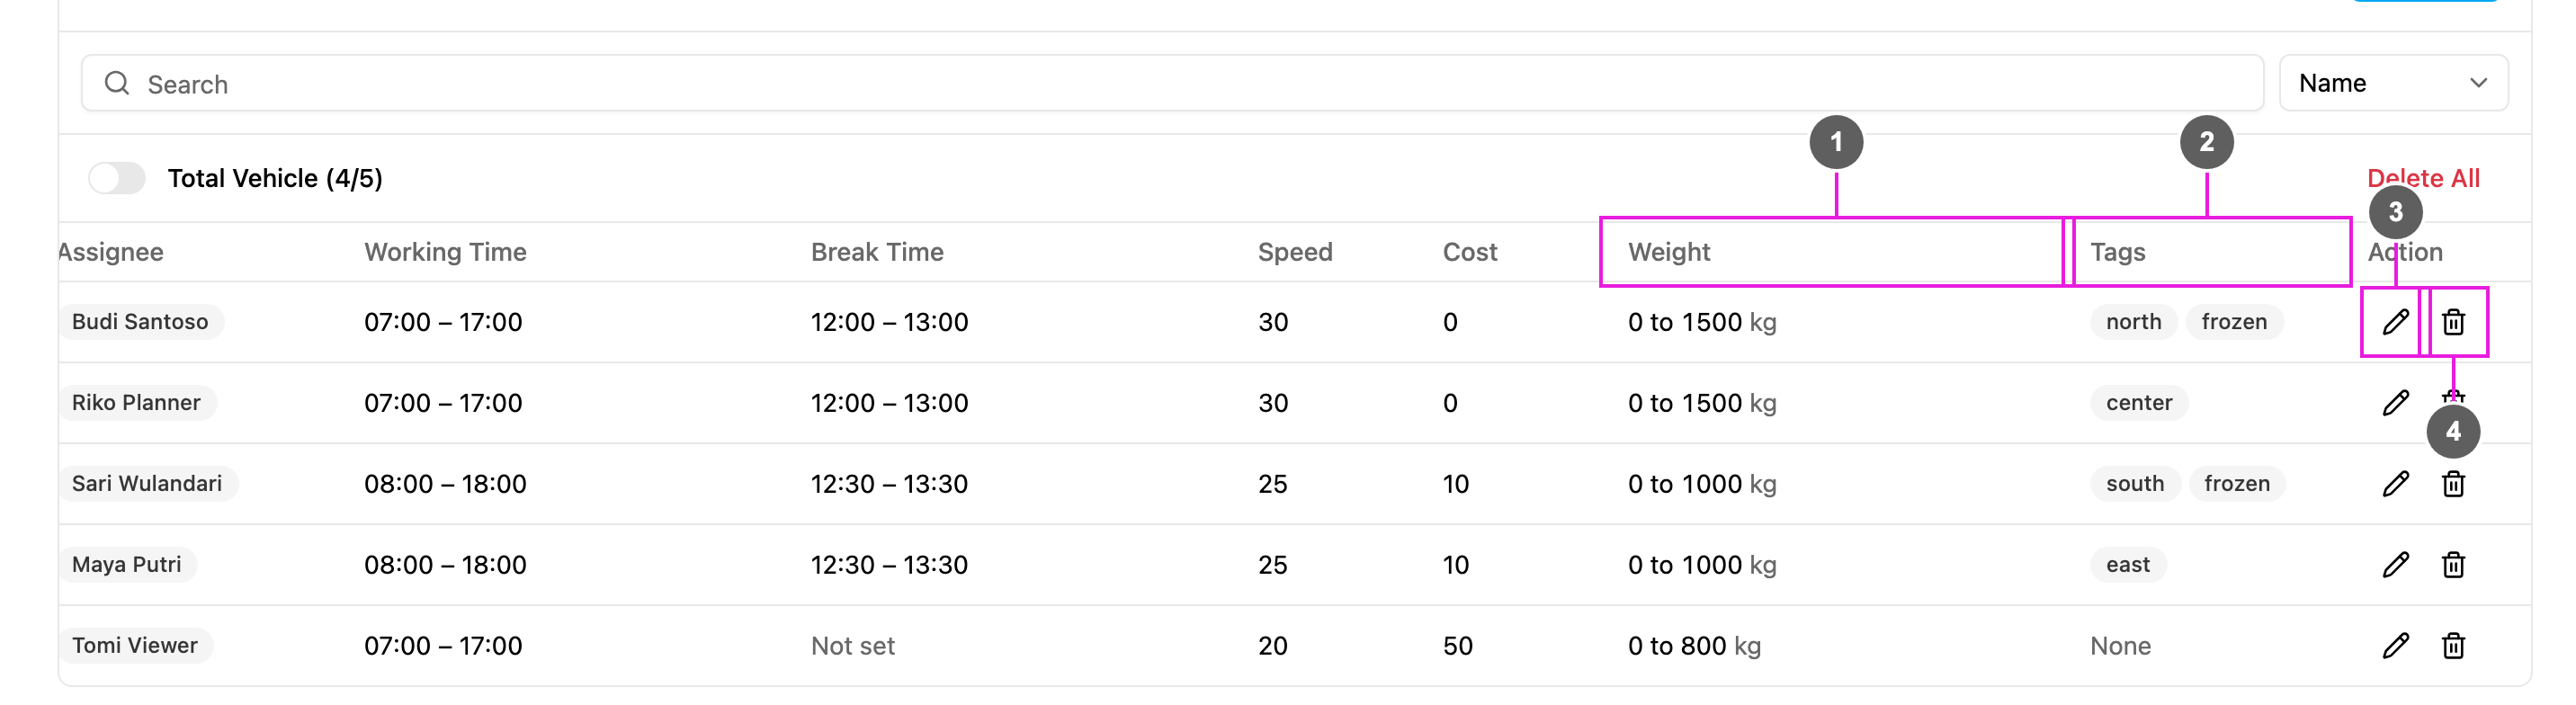
1. **Weight**: the capacity range of each vehicle.
2. **Tags**: the vehicle tags.
3. **Edit**: open the vehicle in a dialog with all its fields.
4. **Delete**: delete this vehicle.
## Creating vehicles
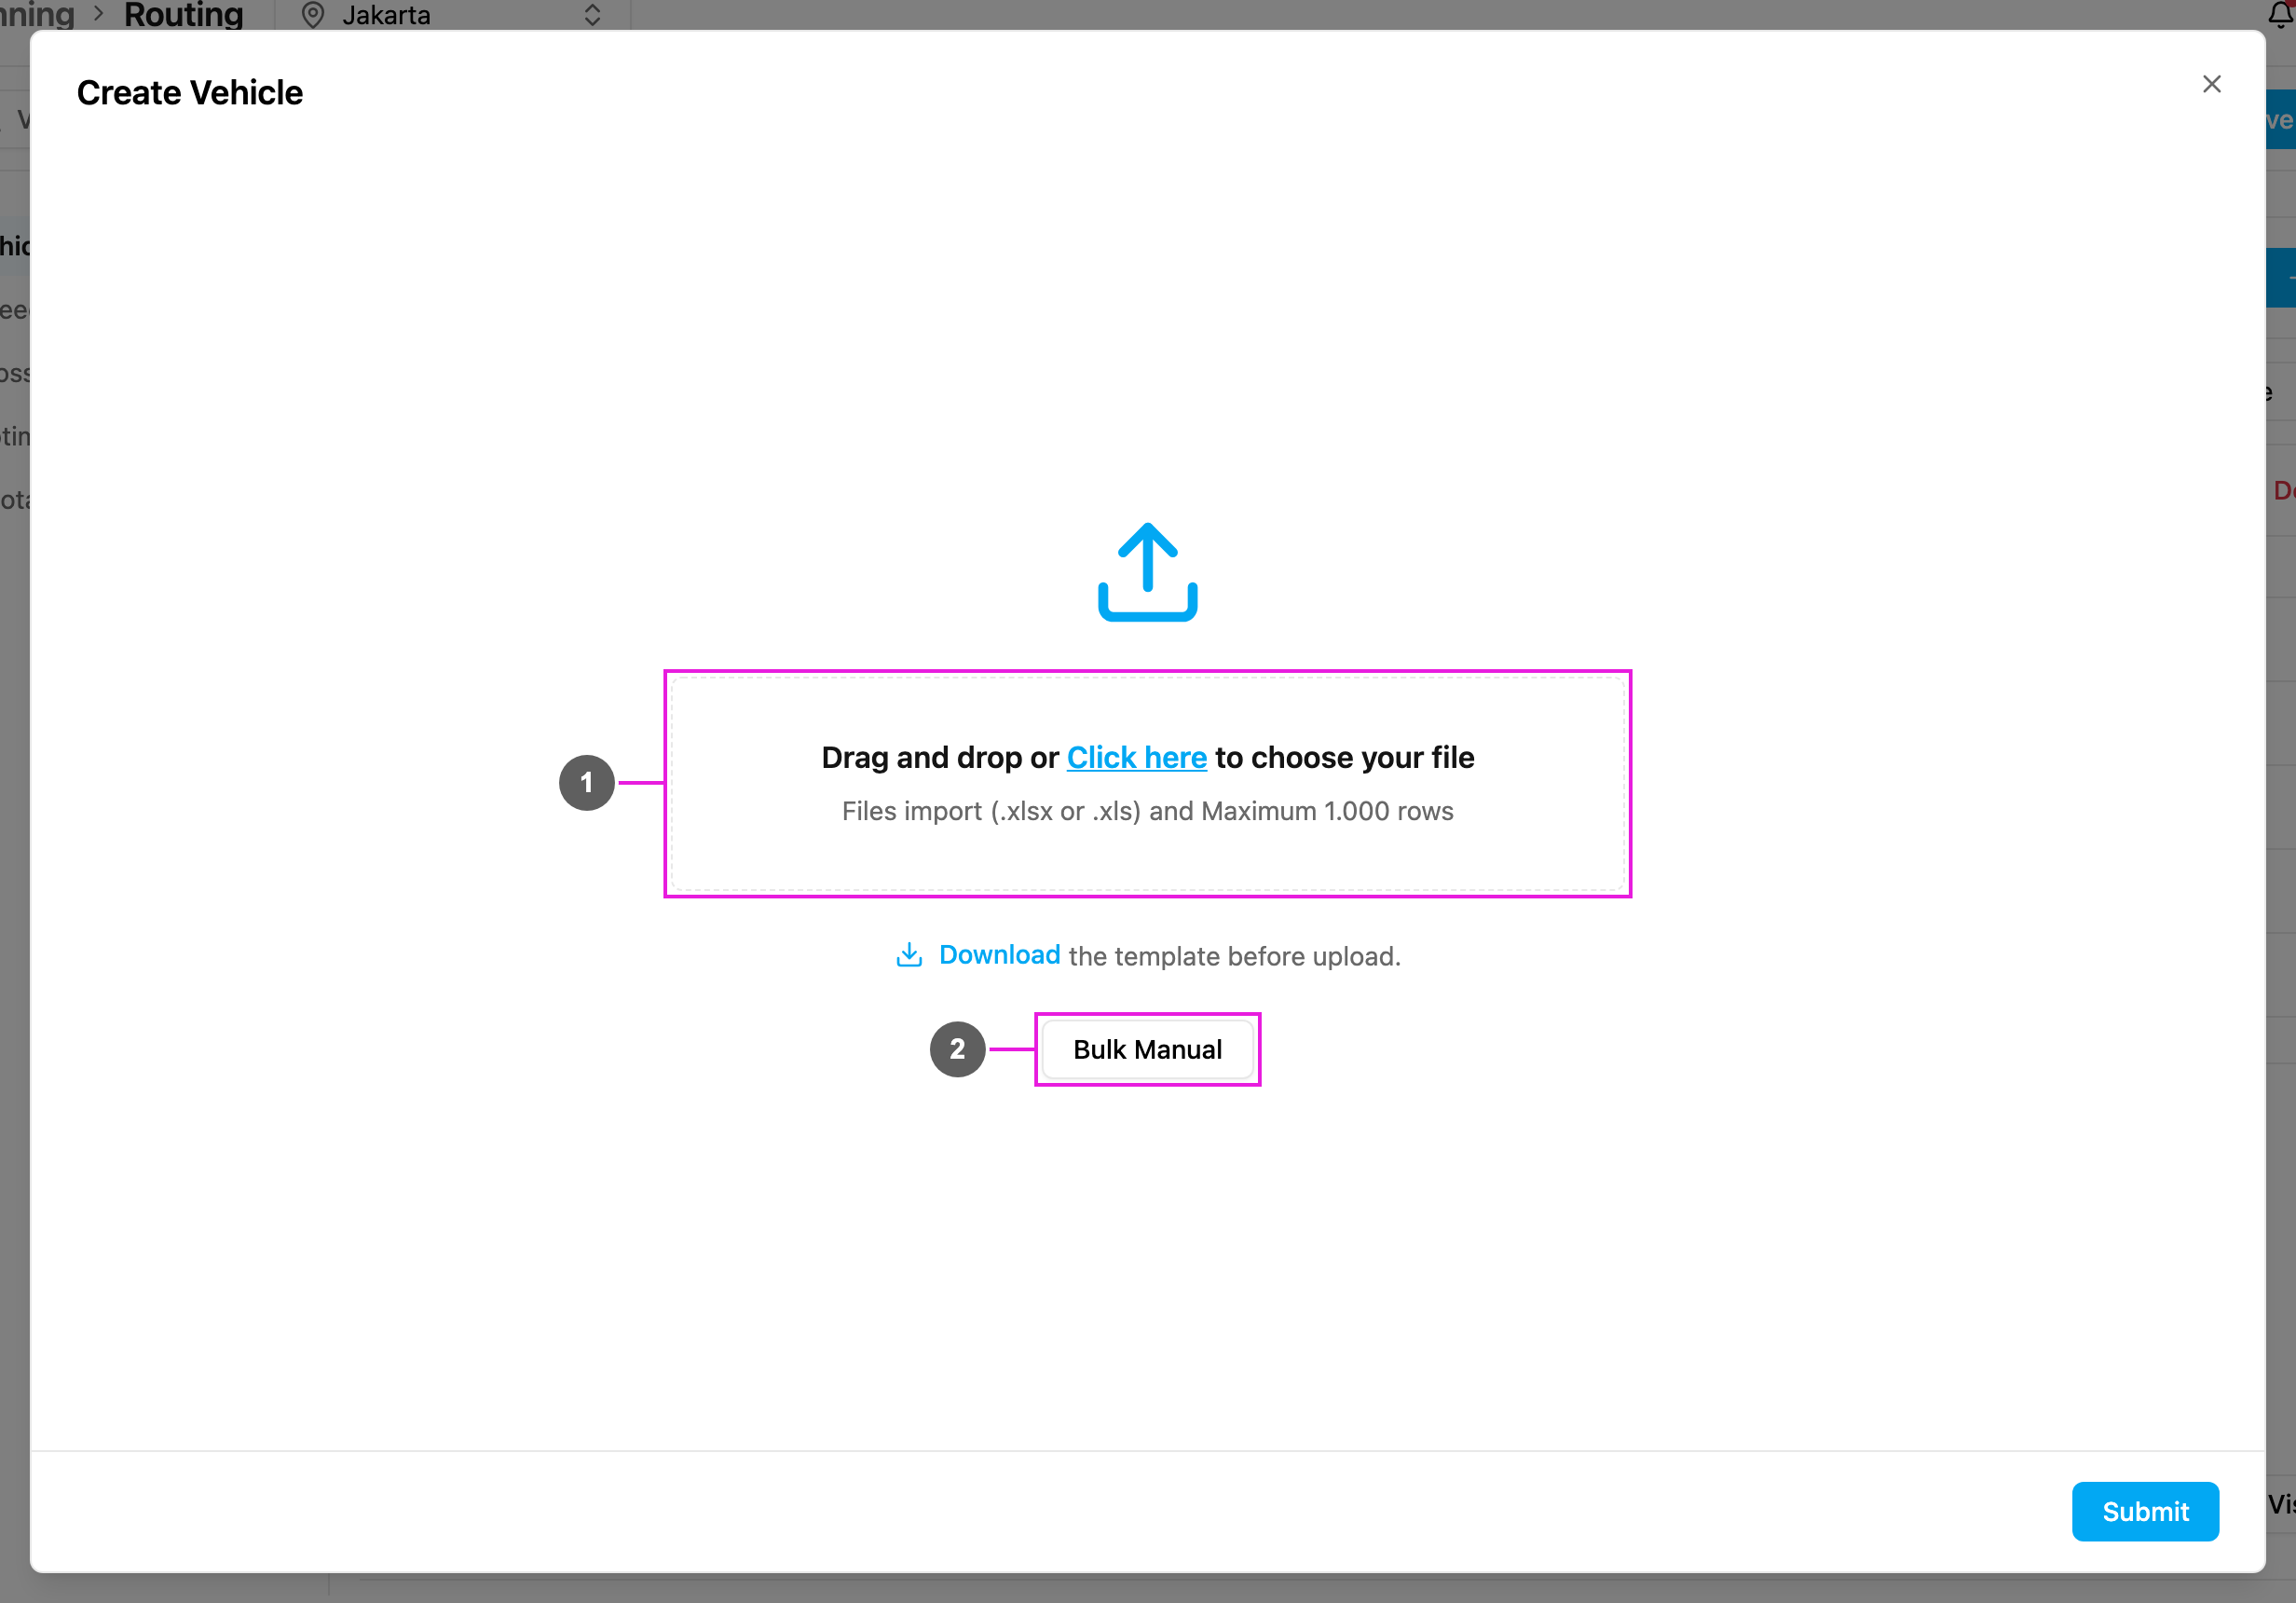
Click **New**. The **Create Vehicle** dialog opens.
1. **Import from a spreadsheet**: drag an `.xlsx` or `.xls` file onto the box, or click **Click here** to choose one. Up to 1,000 rows. Click **Download** first to get the template. See [Importing vehicles](#importing-vehicles).
2. **Bulk Manual**: type one or more vehicles in a table.
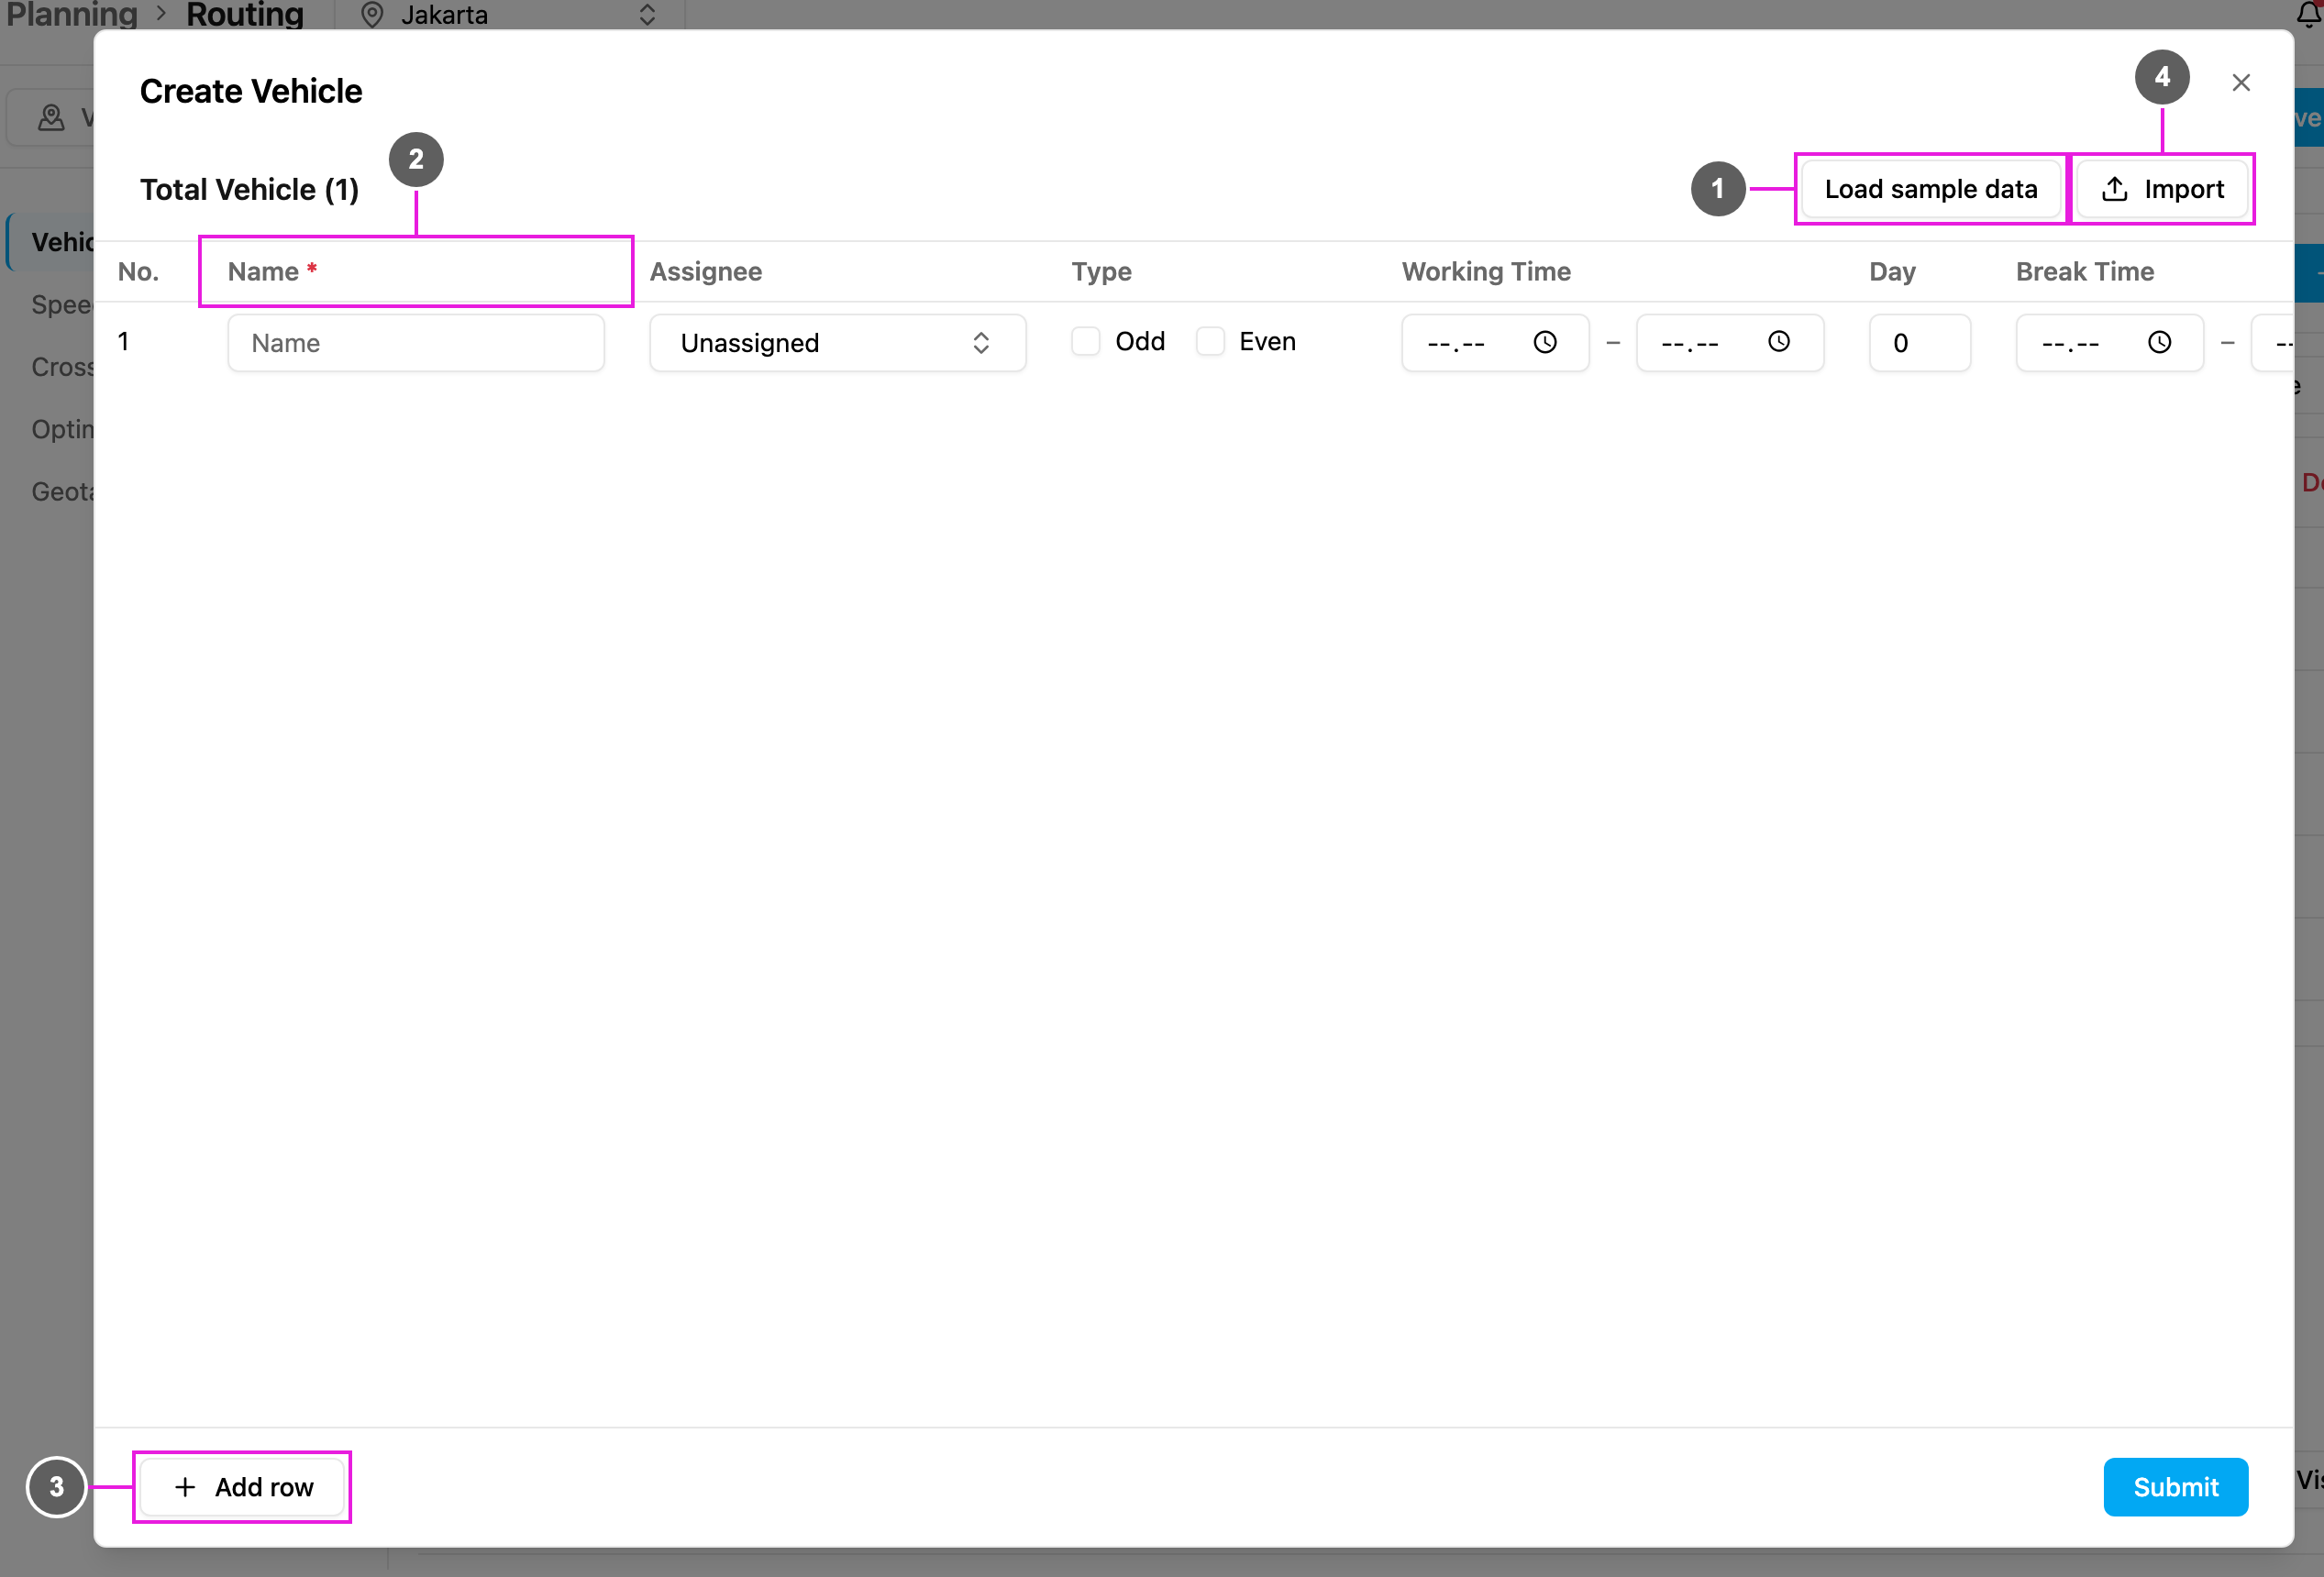
Click **Bulk Manual**:
1. **Load sample data**: fill the table with example vehicles to see what the values look like.
2. **Columns**: one row per vehicle. The columns are described below.
3. **Add row**: add another vehicle. Each row has a **Remove row** icon.
4. **Import**: go back to the spreadsheet import.
Fill in the rows, then click **Submit**. New vehicles are switched on in the current profile. A hub can have up to 1,000 vehicles.
| Field | What to enter |
| - | - |
| **Name** (required) | The vehicle name, for example a plate number such as `B 1234 SYZ`. |
| **Assignee** | The user who drives this vehicle. Leave it **Unassigned** to choose the driver later, when the routes are planned. |
| **Type** | **Odd** or **Even** plate, for [Odd Even](/pages/planning/routing/configuration/odd-even). Leave both empty for any plate. |
| **Working Time** | The daily working hours. See [Working time](#working-time). |
| **Day** | How many extra days the working time runs over, for multi-day routes. `0` means the same day. |
| **Break Time** | The break inside the working hours. See [Break time](#break-time). |
| **Speed Km/h** | The vehicle's average speed, between 5 and 99 km/h. Optional: leave it empty to use the profile's speed. When **Auto Speed** is on the column is locked and the speed is not sent. |
| **Cost Factor** | From 0 to 100, 0 by default. A lower number means the vehicle is used first. See [Cost factor](#cost-factor). |
| **Vehicle Tags** | Tags that pair the vehicle with visits, separated by commas. See [Vehicle tags](#vehicle-tags). |
| **Capacity** | The minimum and maximum load for each capacity constraint of the profile. An empty bound counts as 0, and the maximum can't be below the minimum. |
### Importing vehicles
1. Click **New**, then **Download** to get the template. The template has one column per field (**Name\***, **Assignee**, **Start Time**, **End Time**, **Break Start**, **Break End**, **Multiday**, **Speed Km/h**, **Cost Factor**, **Vehicle Tags**, **Odd Even**) and a minimum and maximum column for each capacity constraint of the profile.
2. Fill in one vehicle per row and save the file.
3. Drag the file onto the box, or click **Click here** and choose it.
The rows open in the **Bulk Manual** table, so you can check and correct them before you click **Submit**. The import stops when:
* the file isn't `.xlsx` or `.xls`, or is larger than 5 MB.
* it has more than 1,000 rows: **Maximum 1.000 rows is exceeded, please reduce the number of rows and try again**.
* it has no rows: **No data found, please check your file and try again**.
* the template is older than the current form, for example after a capacity constraint was added: **There are changes in your form data, please redownload the template before importing the data.**
* the hub already has 1,000 vehicles: **This hub already has the maximum of 1000 vehicles. Remove some vehicles before adding more.**
When only part of the file fits under the 1,000-vehicle limit, the rows that fit are loaded and **Partially imported** says how many were skipped.
## Editing a vehicle
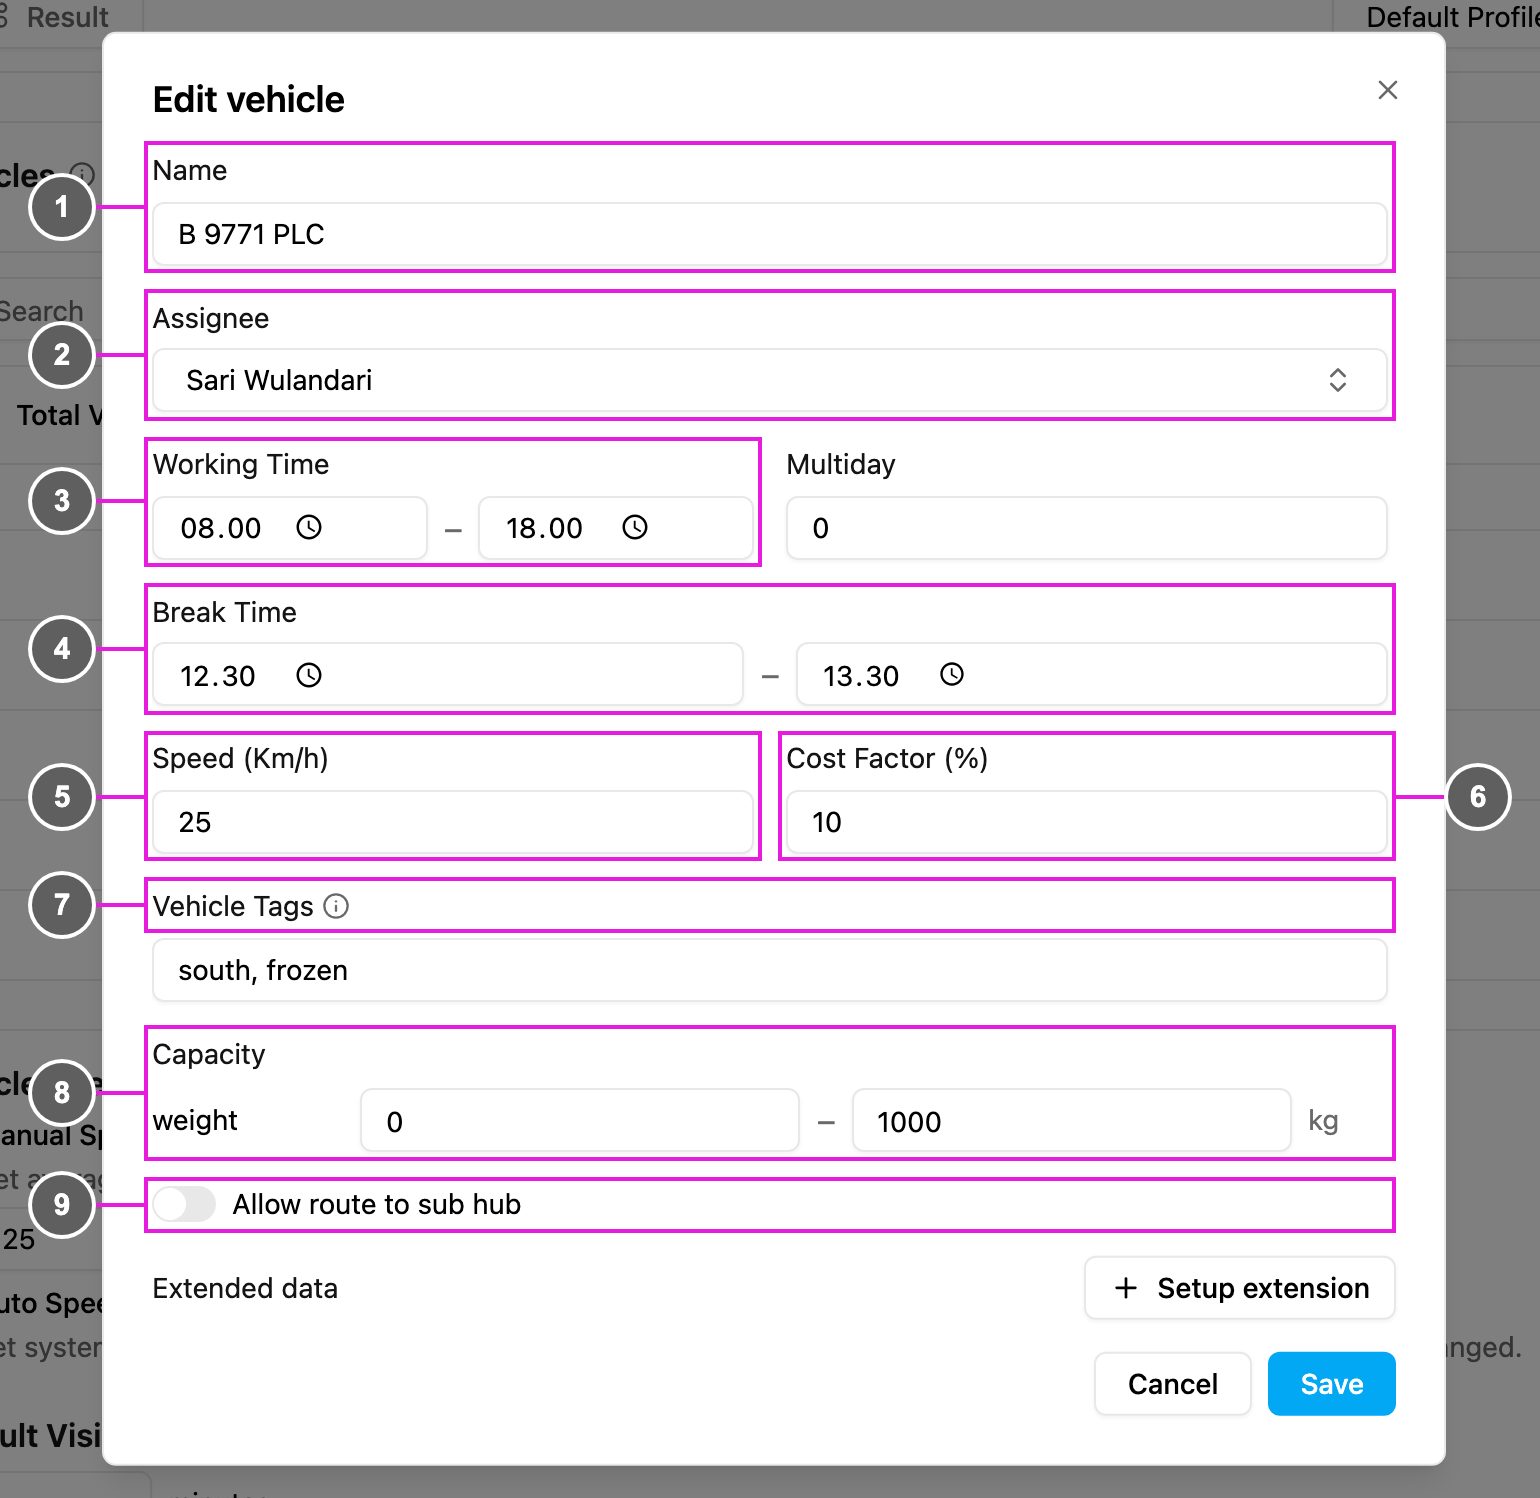
Click a value in the table to change it, or click the edit icon in **Action** to open **Edit vehicle**.
1. **Name**: the vehicle name.
2. **Assignee**: the driver.
3. **Working Time**: the start and end of the working hours. **Multiday** is the number of extra days the working time runs over.
4. **Break Time**: the start and end of the break.
5. **Speed (Km/h)**: from 5 to 99. When **Auto Speed** is on, the field is locked: **Set by Auto Speed in this hub's route configuration.**
6. **Cost Factor (%)**: from 0 to 100.
7. **Vehicle Tags**: up to 10 tags, separated by commas.
8. **Capacity**: the minimum and maximum for each capacity constraint, here **weight** in kg.
9. **Allow route to sub hub**: lets the vehicle carry visits to a sub hub, for [Cross Docking](/pages/planning/routing/configuration/cross-docking).
**Extended data** holds extra fields you add with **Setup extension**. Click **Save** to keep your changes.
### Working time
The vehicle only serves visits inside its working time. When it is empty, the default is **08:00 to 17:00**. The start must be earlier than the end, or the app asks you to fix it.
If [Return to Hub](/pages/planning/routing/configuration/return-to-hub) is on, the trip back to the hub must also fit inside the working time.
To plan routes that span several days in one run, set **Multiday** (or **Day**) to the number of extra days. For example, working time 19:00 – 05:00 with Multiday `1` means 7 PM to 5 AM the next day.
### Break time
The break must be inside the working time, and its start must be earlier than its end. On a multi-day working time, the same break is taken every day: with working time 07:00 – 17:00 (+1 day) and break 12:00 – 13:00, the vehicle breaks from 12:00 to 13:00 on each day.
| Working time | Break time | Result |
| - | - | - |
| 19:00 – 05:00 (+1 day) | 06:00 – 07:00 | Fails: the break starts after the working time ends. |
| 19:00 – 05:00 (+1 day) | 00:00 – 01:00 | Succeeds: the break is inside the working time. |
| 19:00 – 05:00 (+1 day) | 18:00 – 19:00 | Fails: the break starts before the working time starts. |
### Cost factor
The cost factor is a cost multiplier that sets which vehicles are used first. If vehicle A has cost factor `1` and vehicle B has `10`, using B counts as ten times more expensive than using A.
This is useful when you combine your own fleet with vendor vehicles: give your own vehicles a low cost (for example `0`) and vendor vehicles a high one (for example `10`), and the optimization fills your own vehicles first.
### Vehicle tags
A visit can only go to a vehicle that has **all** of the visit's tags. The vehicle may have more tags than the visit.
| Vehicle tags | Visit tags | Result |
| - | - | - |
| a, b | a, b, c | The visit is dropped: the vehicle lacks **c**. |
| a, b, c | a, b, c | The visit is planned. |
| a, b, c, d | a, b, c | The visit is planned. |
Common uses are road access (tag visits and vehicles **small**, **medium** or **big** by the road size) and dedicated vehicles (tag cash-on-delivery vehicles and visits **COD**).
## Deleting vehicles
* **One vehicle**: click the delete icon in **Action** and confirm **Delete this vehicle?**. The vehicle is removed from the hub, so from every profile.
* **Every vehicle**: click **Delete All** and confirm **Delete every vehicle in this hub?**. All vehicles of the hub are permanently deleted, not just unselected. This cannot be undone.
To stop using a vehicle in one profile only, switch off its **Use** switch instead.
This documentation is built and hosted on [Mintlify](https://mintlify.com), a developer documentation platform.