> ## Documentation Index
> Fetch the complete documentation index at: https://docsv4.mile.app/llms.txt
> Use this file to discover all available pages before exploring further.
# Creating a data type
> Name a data type, choose who sees its records, and add its fields.
Required permission:
* View data type
* Create data type
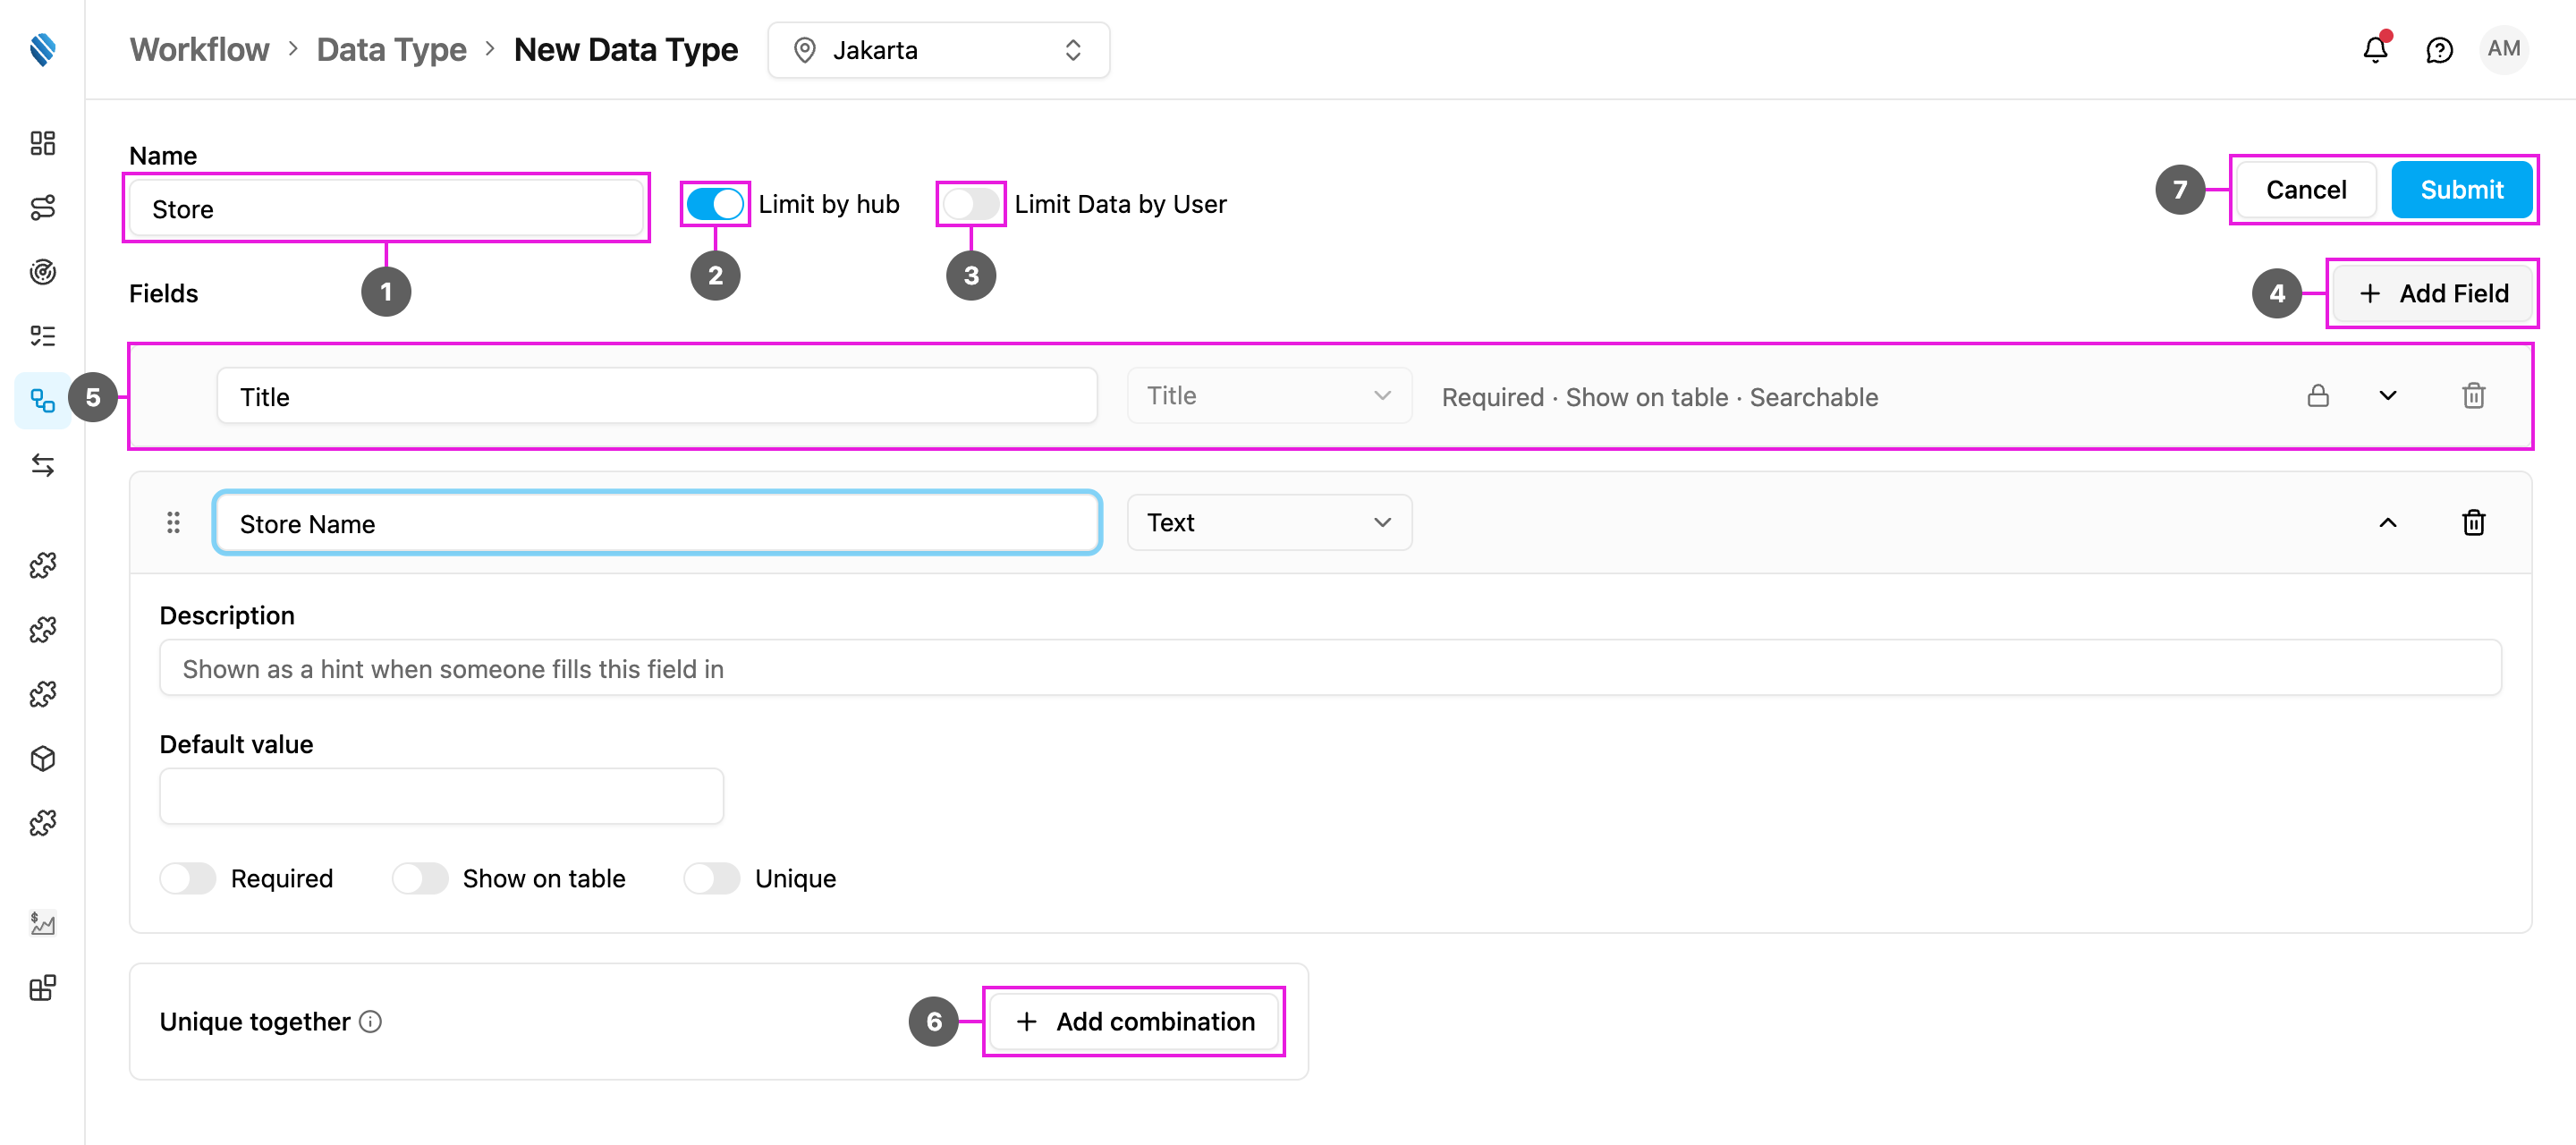
Open **Workflow › Data Type** and click **New**. The **New Data Type** page opens with one field already in place, the **Title**.
If your organization already has as many data types as its plan allows, **New** opens an **Upgrade Plan** dialog instead, for example *You can only have 3 data types on the Free plan.* Click **Upgrade now** to change the plan. Opening the New Data Type page's address directly also returns you to the list with this dialog.
1. **Name**: the name of the data type, for example *Store*. Use letters, numbers, dashes and underscores only, no spaces.
2. **Limit by hub**: on, each record belongs to one or more hubs and people see only the records of the hub they are working in. Off, the records are shared by every hub. This can only be set when you create the data type.
3. **Limit Data by User**: on, each record can be limited to chosen users or teams, and only they see it. See [Limit records by user](/pages/workflow/data-source/adding-records#limit-records-by-user).
4. **Add Field**: add a field. A new field opens ready to fill in.
5. **Title**: the field that identifies each record, such as a store code or a customer code. Every data type has exactly one Title. It is always first, and it is always required, unique, searchable and shown on the table, so you can't change those settings or remove it (the lock shows why). Its label and description can be changed.
6. **Add combination**: make a combination of fields unique together (see below).
7. **Cancel** or **Submit**. When you submit, the data type is created and opens for editing.
## Set up a field
Each field is a row. Click the arrow on the right of a row to expand it.
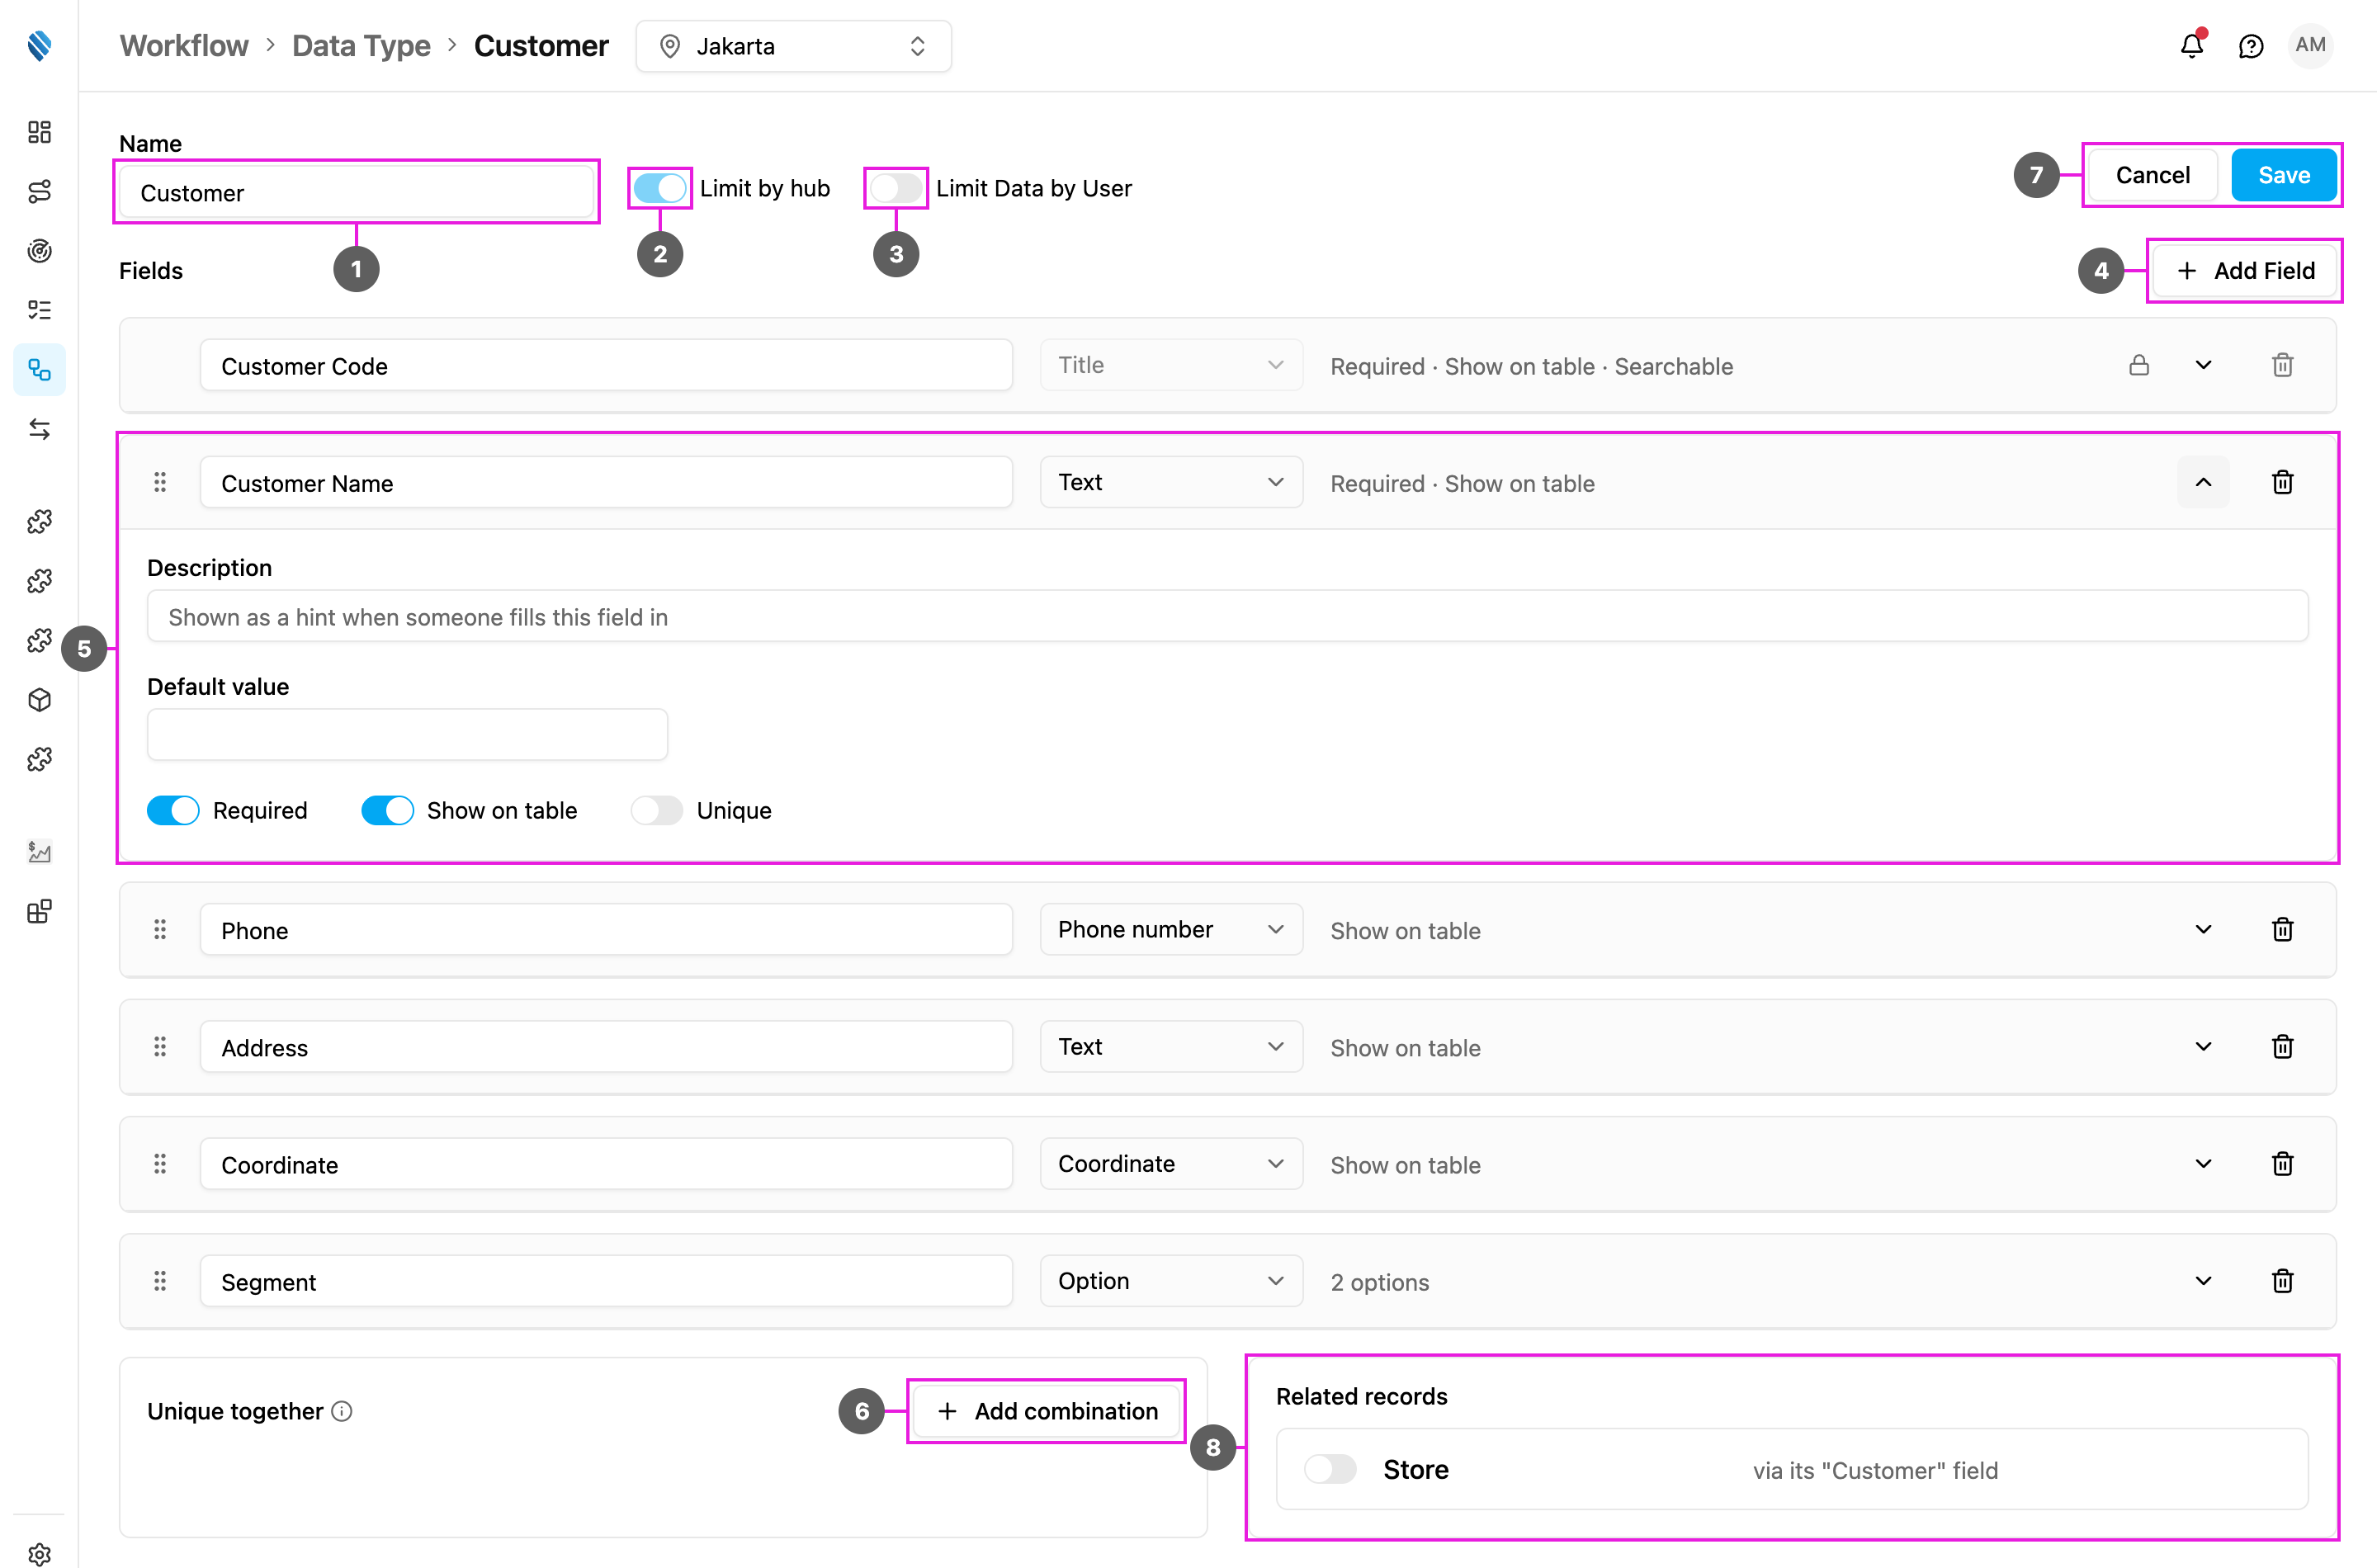
This example edits the *Customer* data type.
1. **Name**: the data type's name.
2. **Limit by hub**.
3. **Limit Data by User**.
4. **Add Field**.
5. An expanded field:
* **Label**: the field's name, as people see it on the record form and the table.
* **Type**: what kind of value it holds. See [Field types](/pages/workflow/data-type/field-types).
* **Description**: a hint shown next to the field when someone fills it in.
* **Rules**, depending on the type: **Default value**, **Minimum**, **Maximum**, **Decimal places**, or the list of **Options**.
* **Required**: the field must be filled in. A **Multi option** field has no Required switch; set **Minimum choices** instead.
* **Show on table**: show the field as a column on the Data Source table. At most 5 fields can be shown, including the Title.
* **Searchable** (Relation fields only): the Data Source search also matches the title of the linked record, so searching *Toko Maju Jaya* finds every store linked to that customer. At most 5 Relation fields can be searchable. Other fields don't need it: the Data Source search already matches the value of every field.
* **Unique**: no two records can have the same value in this field. For a Relation field, Unique is set in its relation settings instead, see [Relation](/pages/workflow/data-type/field-types#relation).
A collapsed row shows a summary, for example *Required · Show on table*, or for a Relation field its target and relationship, such as *Customer · Single*. Drag a row by its handle to change the order of the fields. The bin removes a field.
6. **Add combination**: in the **Unique together** box.
7. **Cancel** and **Save** (shown when you edit a data type).
8. **Related records**: shown beside **Unique together** once another data type links to this one. See [Related records on the target](/pages/workflow/data-type/field-types#related-records-on-the-target).
## Unique together
**Unique together** stops two records from repeating the same combination of values. For example, a combination of *Store Name* and *City* lets two cities each have a store called *Pasar Baru*, but not two in the same city.
Click **Add combination** and choose at least two fields. You can add several combinations, but the same combination can't be listed twice. If a combination has fewer than two fields when you save, the message *Each unique combination needs at least 2 fields.* shows under that combination. The Title can't be part of a combination, because it's already unique on its own. A Relation field can be part of one.
## Link to another data type
A **Relation** field links a record to a record of another data type, or to a user, hub, vehicle, role or task type. See [Relation](/pages/workflow/data-type/field-types#relation) and [Linked records](/pages/workflow/data-source/linked-records).
## After you submit
The data type is ready to use right away:
* Add its records in [Data Source](/pages/workflow/data-source/adding-records).
* Fill task fields from its records: [Task type Configuration › Data source](/pages/workflow/task-type/configuration#data-source).
* Create or update its records from an automation: [Create or update data source](/pages/workflow/automation/actions/create-or-update-data-source).
This documentation is built and hosted on [Mintlify](https://mintlify.com), a developer documentation platform.