

Required permission:
- View vehicle
- Create vehicle (add vehicles)
- Edit vehicle (edit a vehicle)
- Delete vehicle (delete one or all vehicles)
Vehicle table
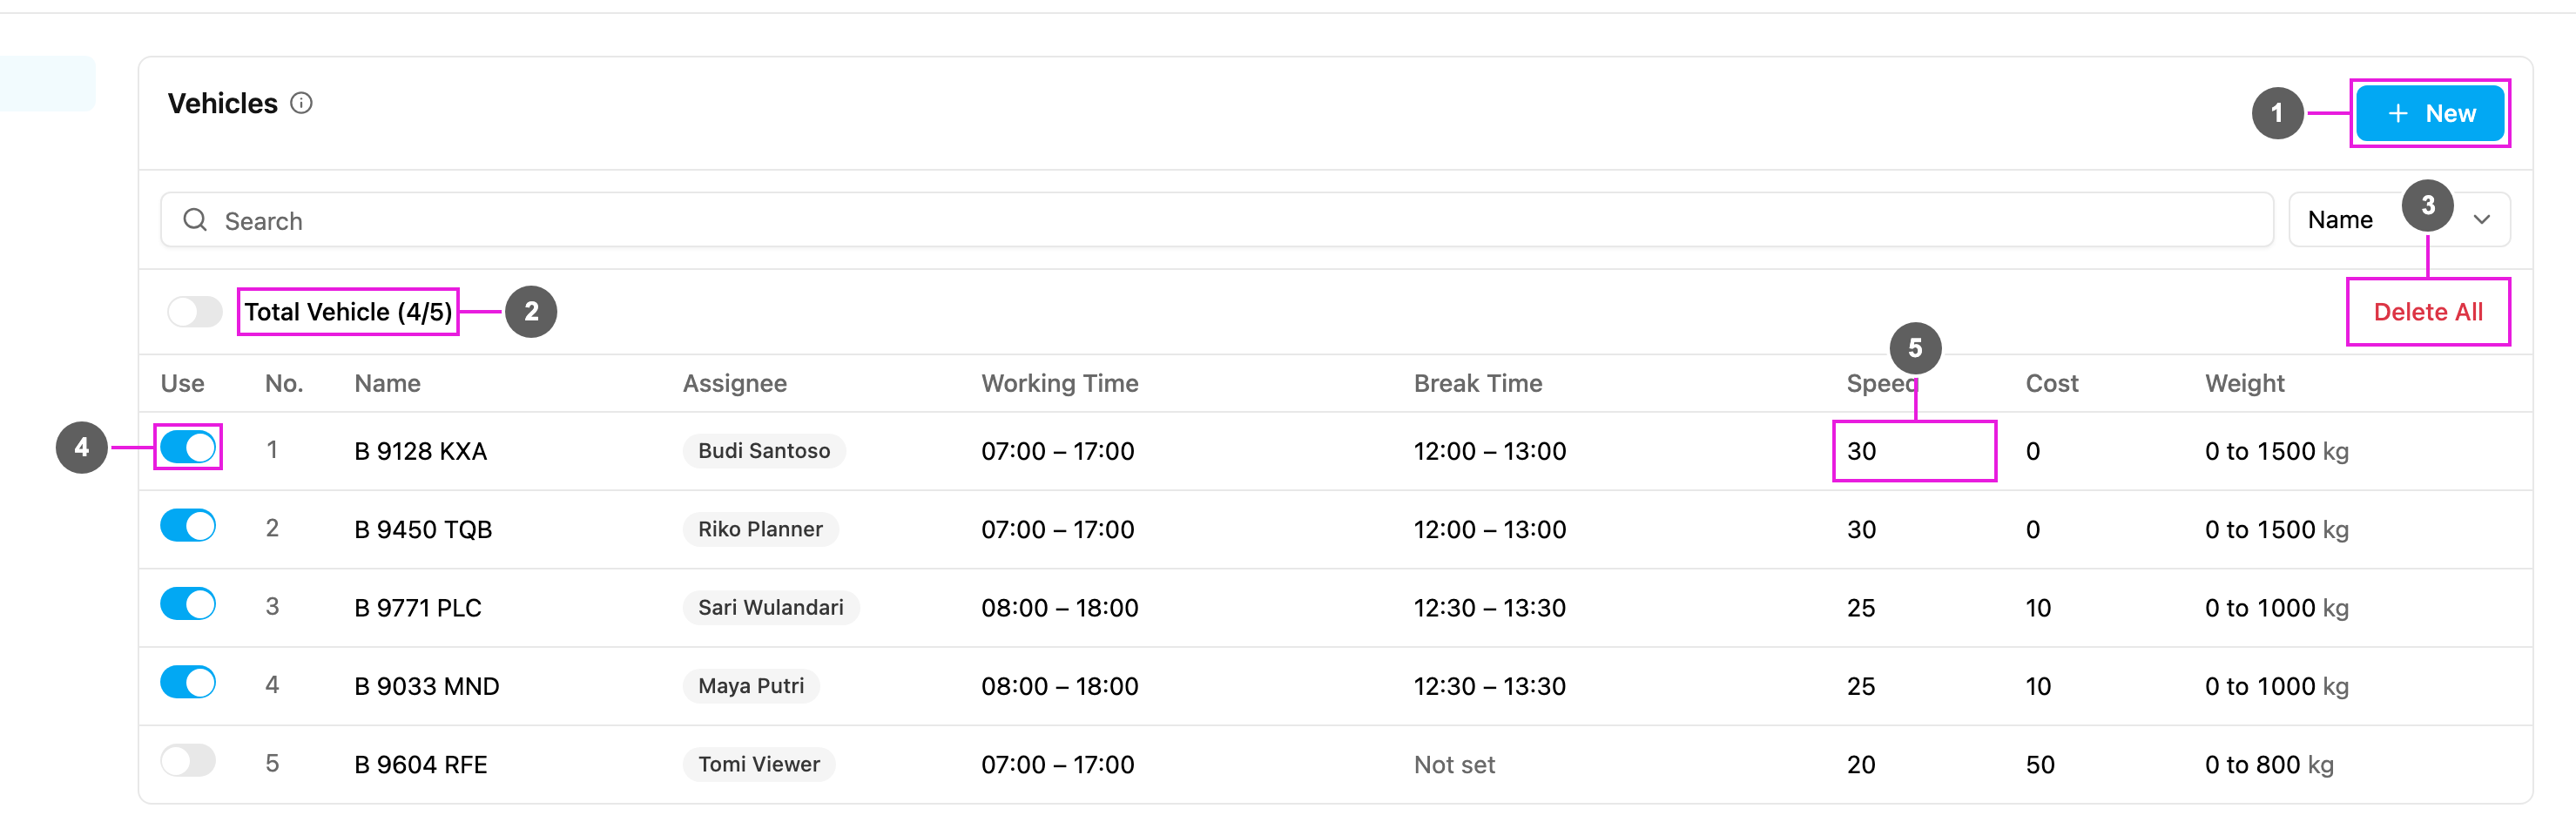
- New: add vehicles. See Creating vehicles.
- Total Vehicle: how many vehicles are used by this profile out of all the hub’s vehicles, for example Total Vehicle (4/5). The switch next to it selects or unselects all of them.
- Delete All: delete every vehicle of the hub. See Deleting vehicles.
- Use: switch a vehicle on to send it to the optimization with this profile. Switched-off vehicles stay in the list but are not planned.
- Speed: click a value in the table to change it in place. Name, assignee, working time, break time, speed, cost, capacity and tags can all be changed this way.
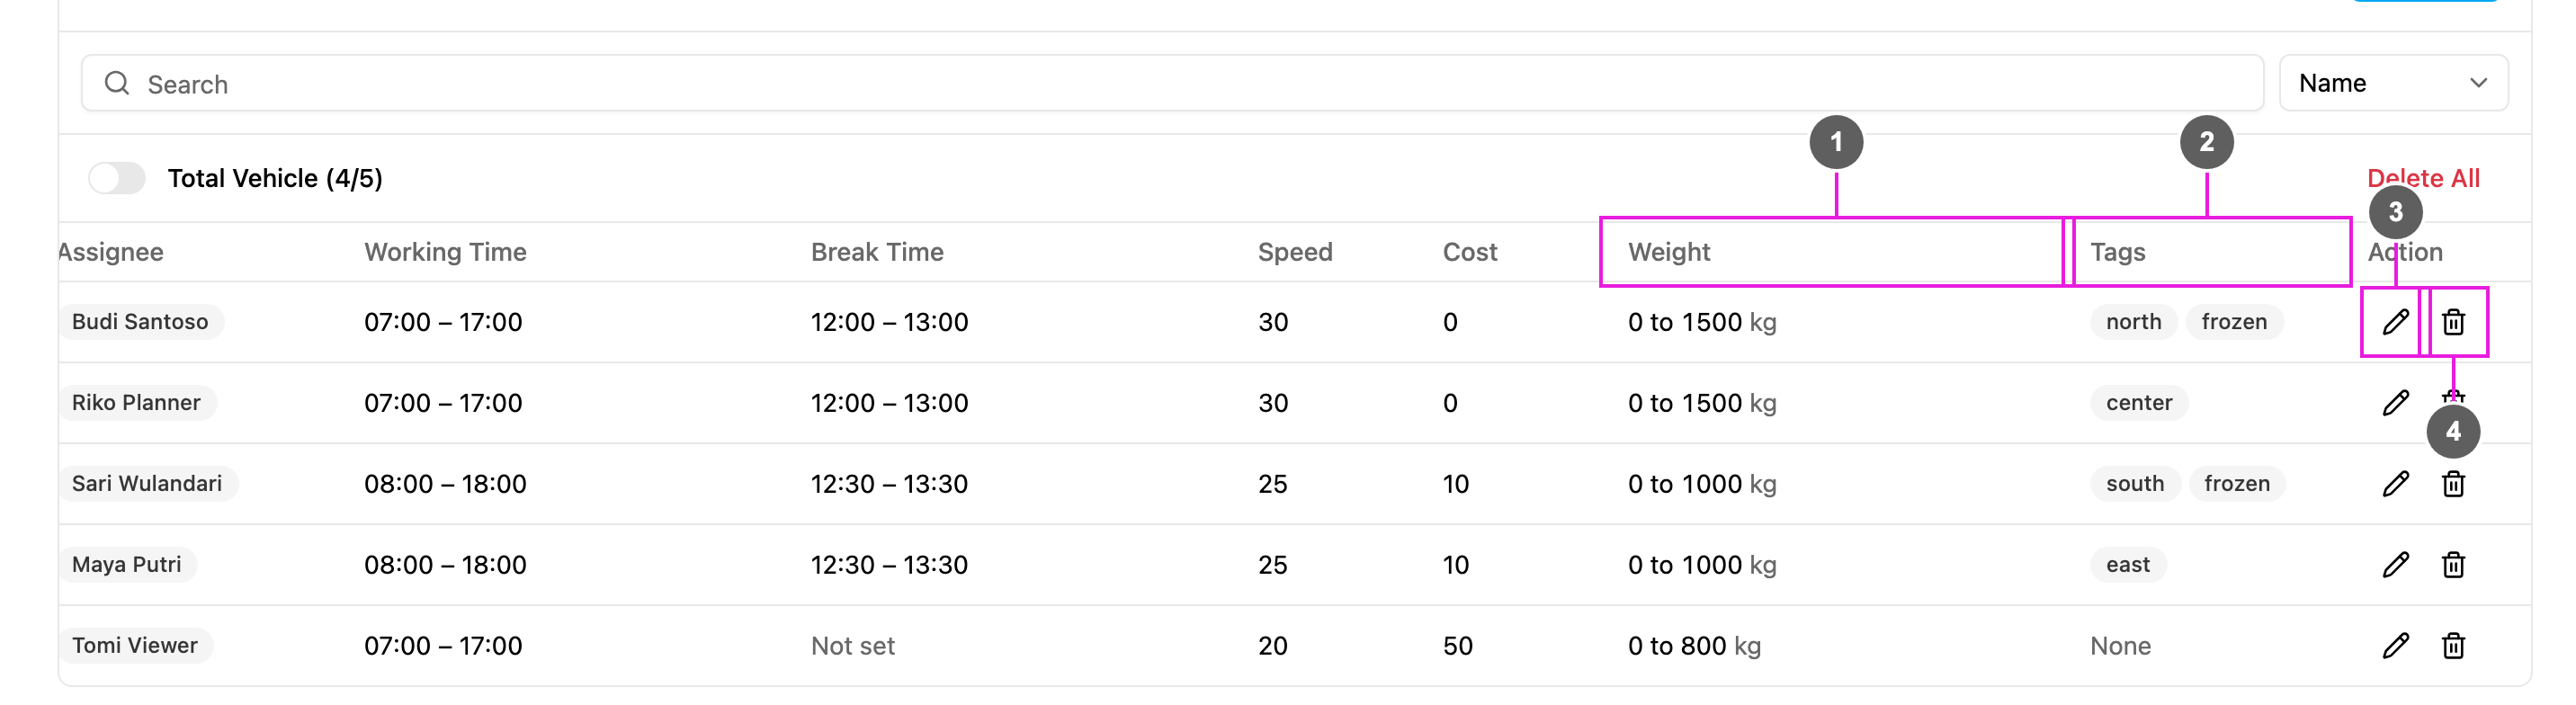
- Weight: the capacity range of each vehicle.
- Tags: the vehicle tags.
- Edit: open the vehicle in a dialog with all its fields.
- Delete: delete this vehicle.
Creating vehicles
Click New. The Create Vehicle dialog opens.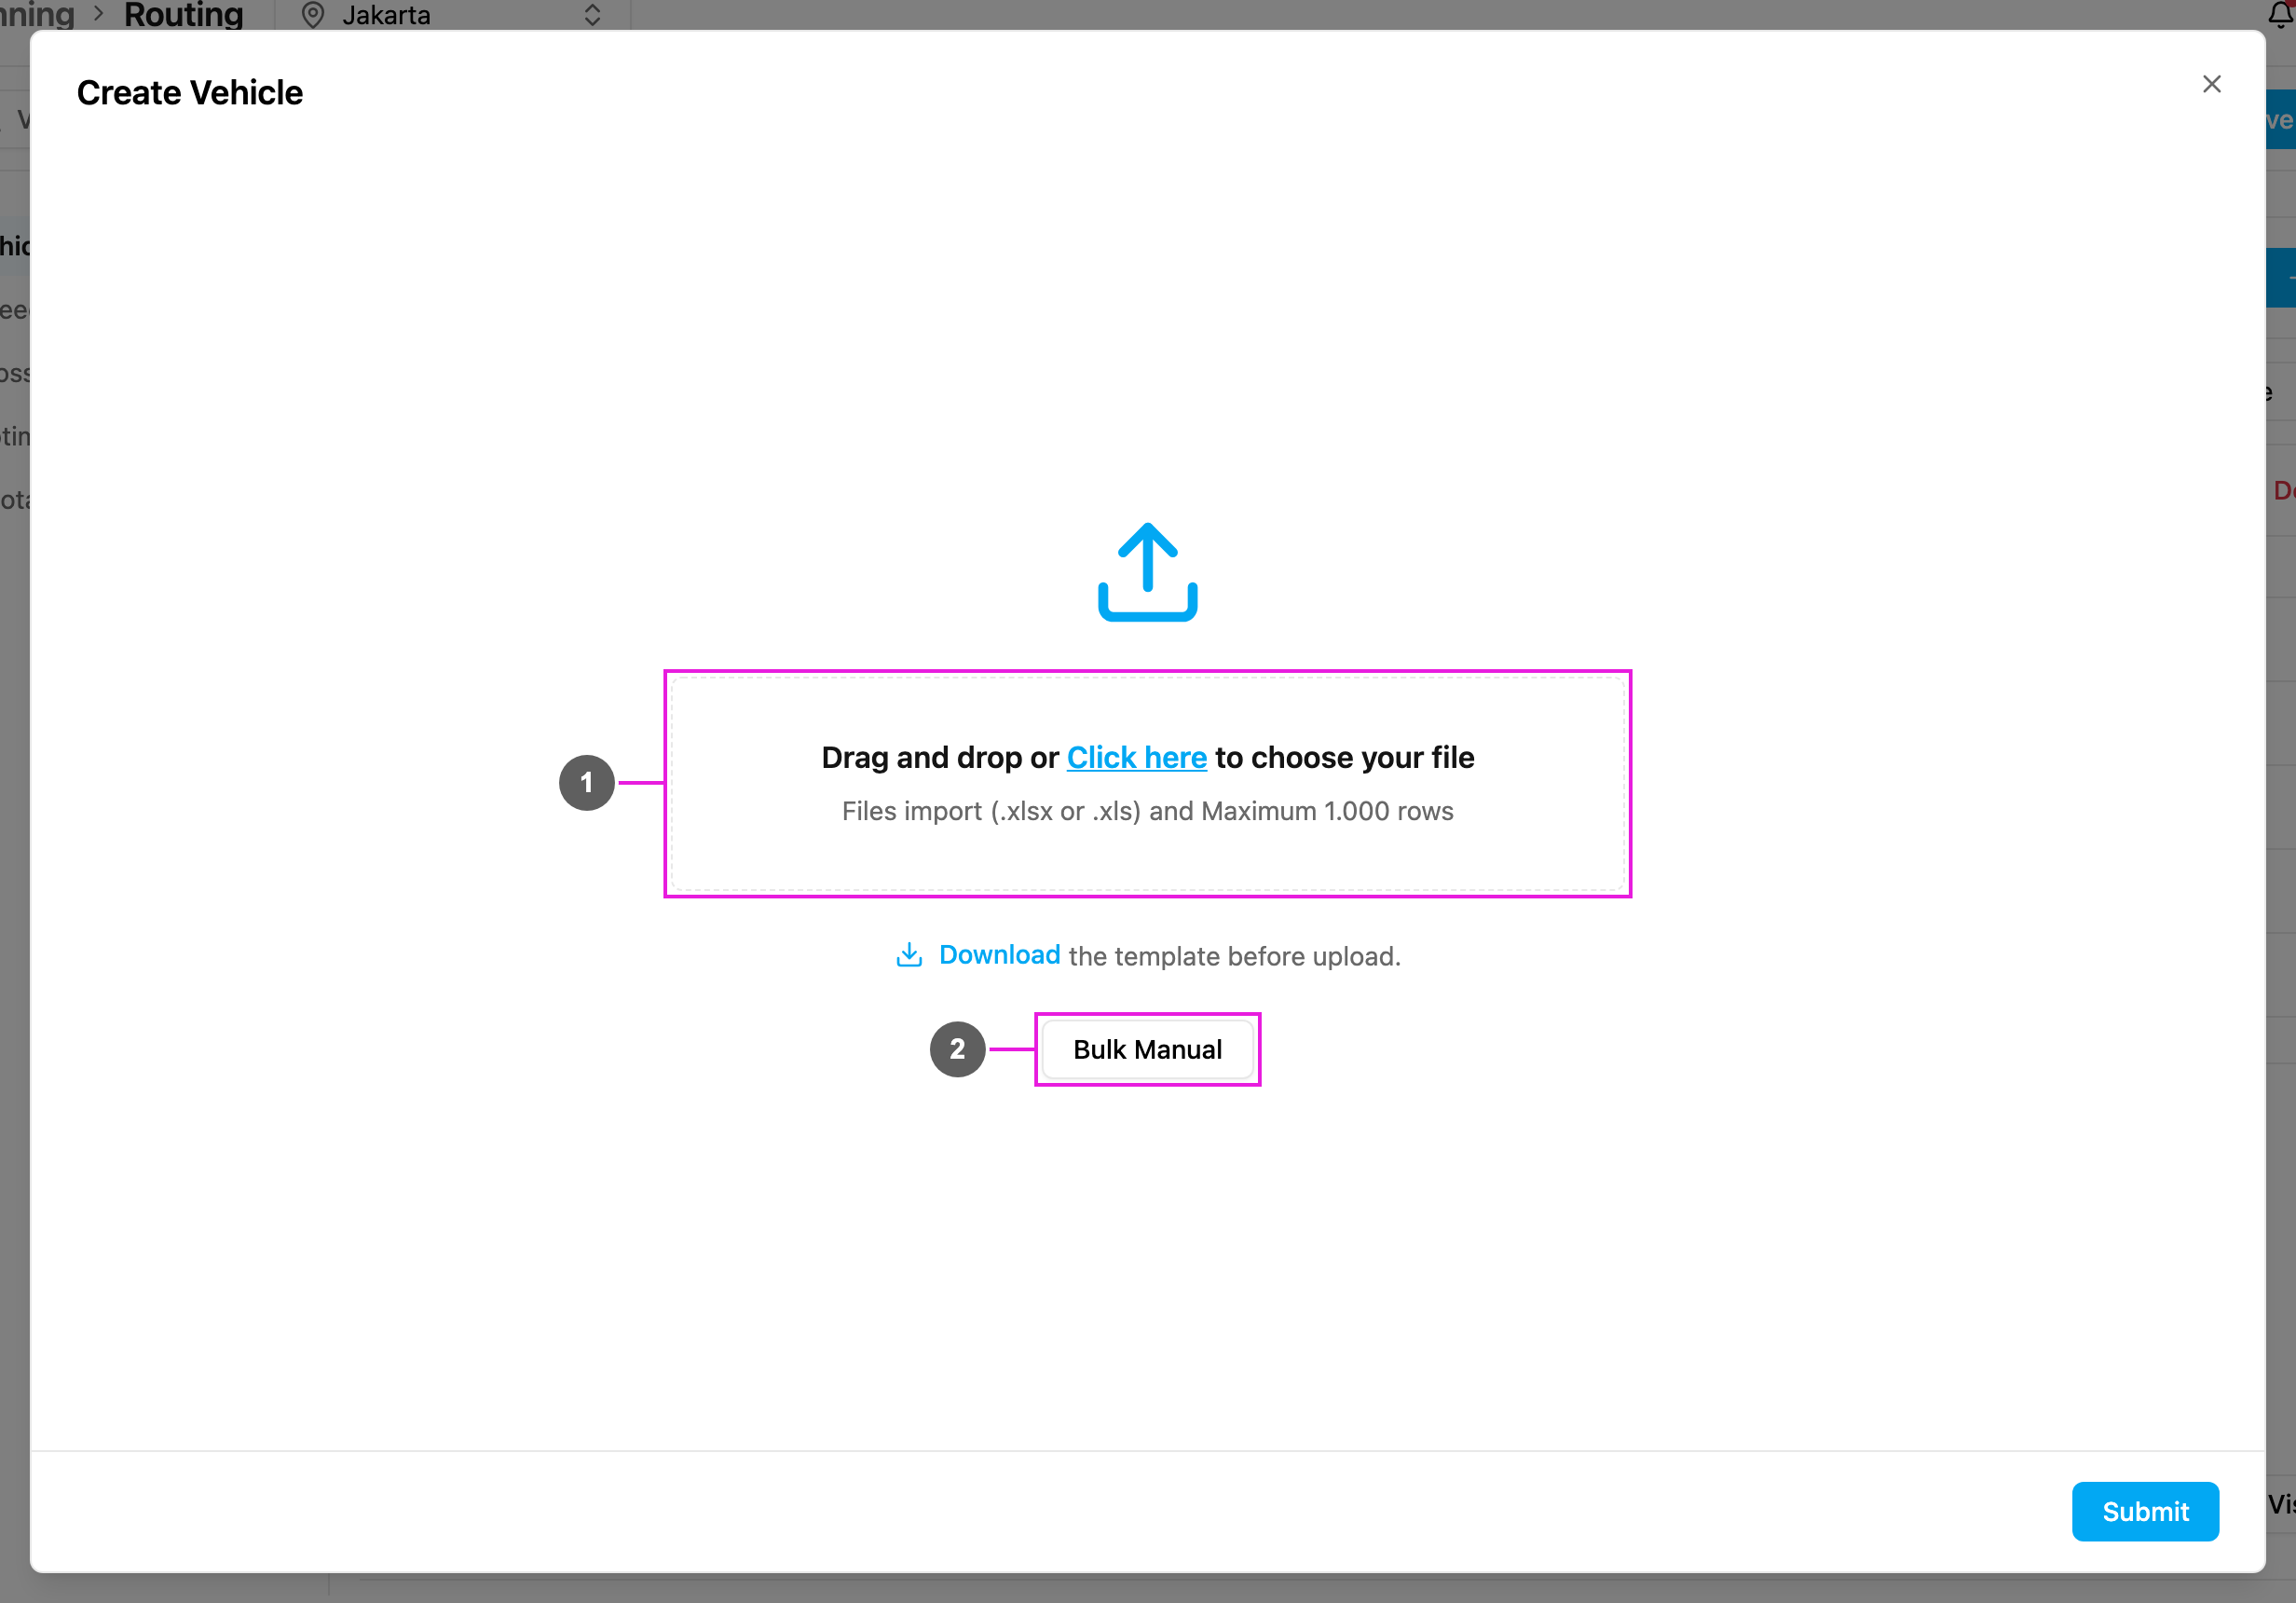
- Import from a spreadsheet: drag an
.xlsxor.xlsfile onto the box, or click Click here to choose one. Up to 1,000 rows. Click Download first to get the template. See Importing vehicles. - Bulk Manual: type one or more vehicles in a table.
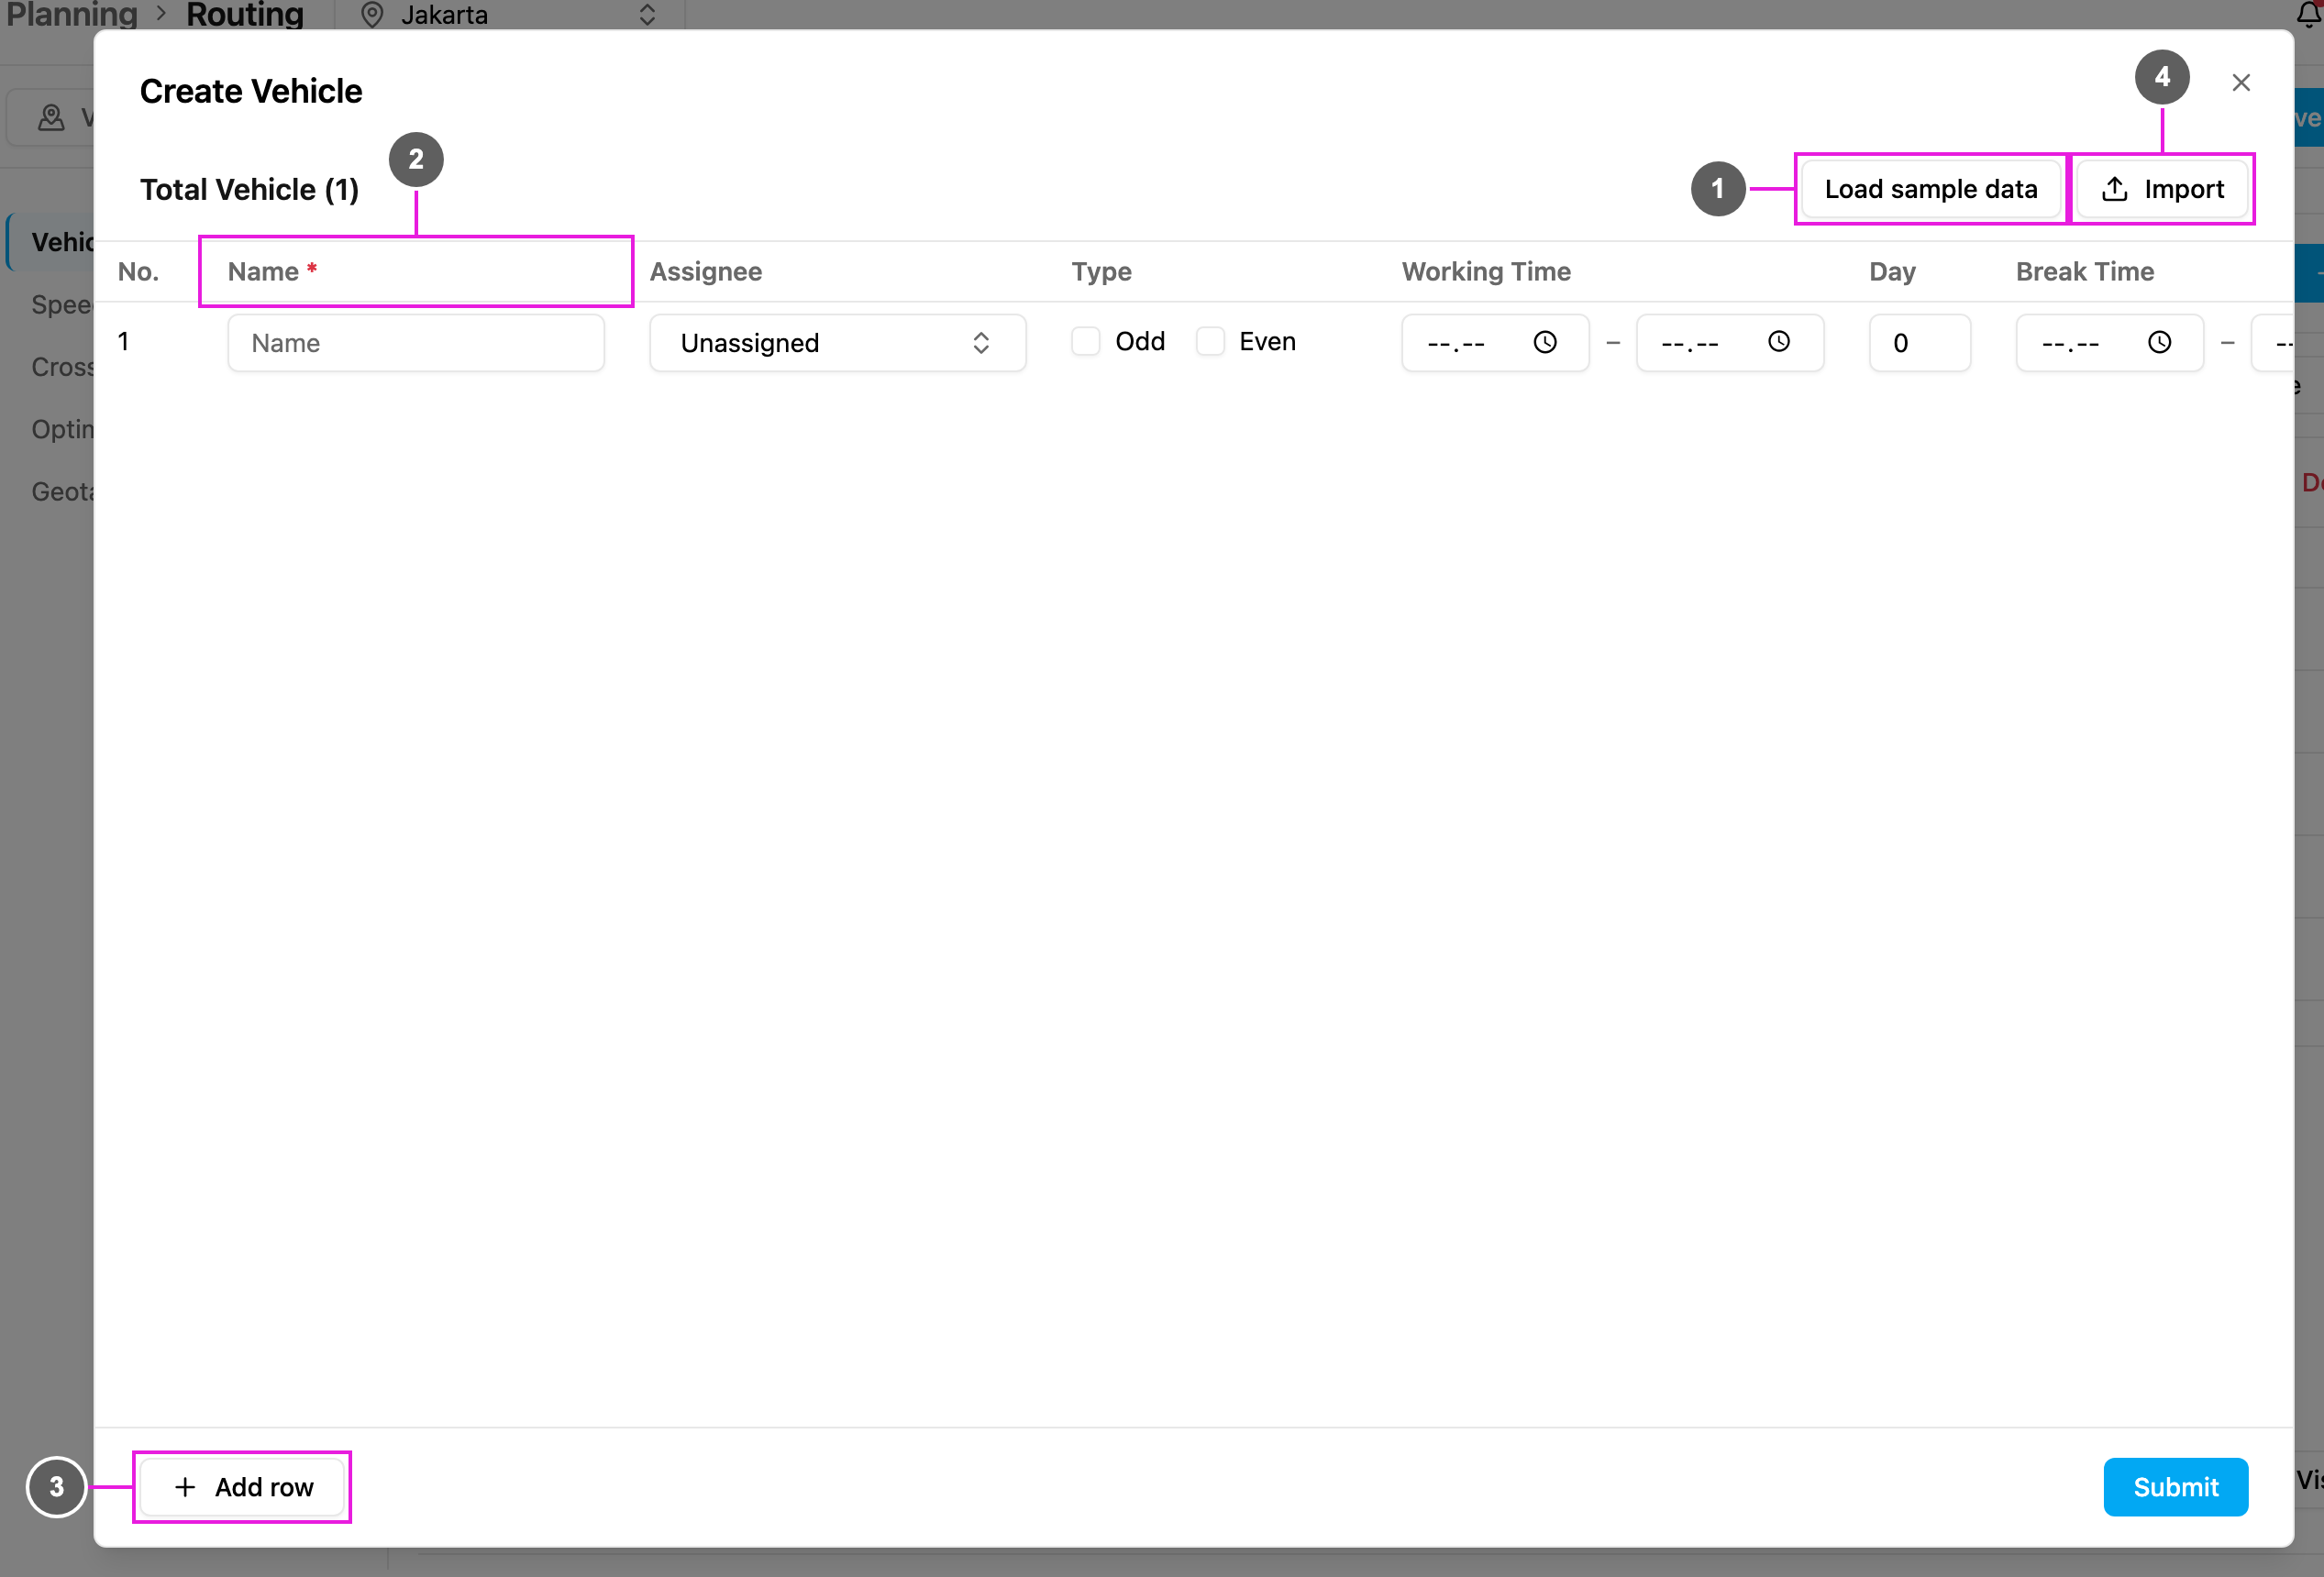
- Load sample data: fill the table with example vehicles to see what the values look like.
- Columns: one row per vehicle. The columns are described below.
- Add row: add another vehicle. Each row has a Remove row icon.
- Import: go back to the spreadsheet import.
Importing vehicles
- Click New, then Download to get the template. The template has one column per field (Name*, Assignee, Start Time, End Time, Break Start, Break End, Multiday, Speed Km/h, Cost Factor, Vehicle Tags, Odd Even) and a minimum and maximum column for each capacity constraint of the profile.
- Fill in one vehicle per row and save the file.
- Drag the file onto the box, or click Click here and choose it.
- the file isn’t
.xlsxor.xls, or is larger than 5 MB. - it has more than 1,000 rows: Maximum 1.000 rows is exceeded, please reduce the number of rows and try again.
- it has no rows: No data found, please check your file and try again.
- the template is older than the current form, for example after a capacity constraint was added: There are changes in your form data, please redownload the template before importing the data.
- the hub already has 1,000 vehicles: This hub already has the maximum of 1000 vehicles. Remove some vehicles before adding more.
Editing a vehicle
Click a value in the table to change it, or click the edit icon in Action to open Edit vehicle.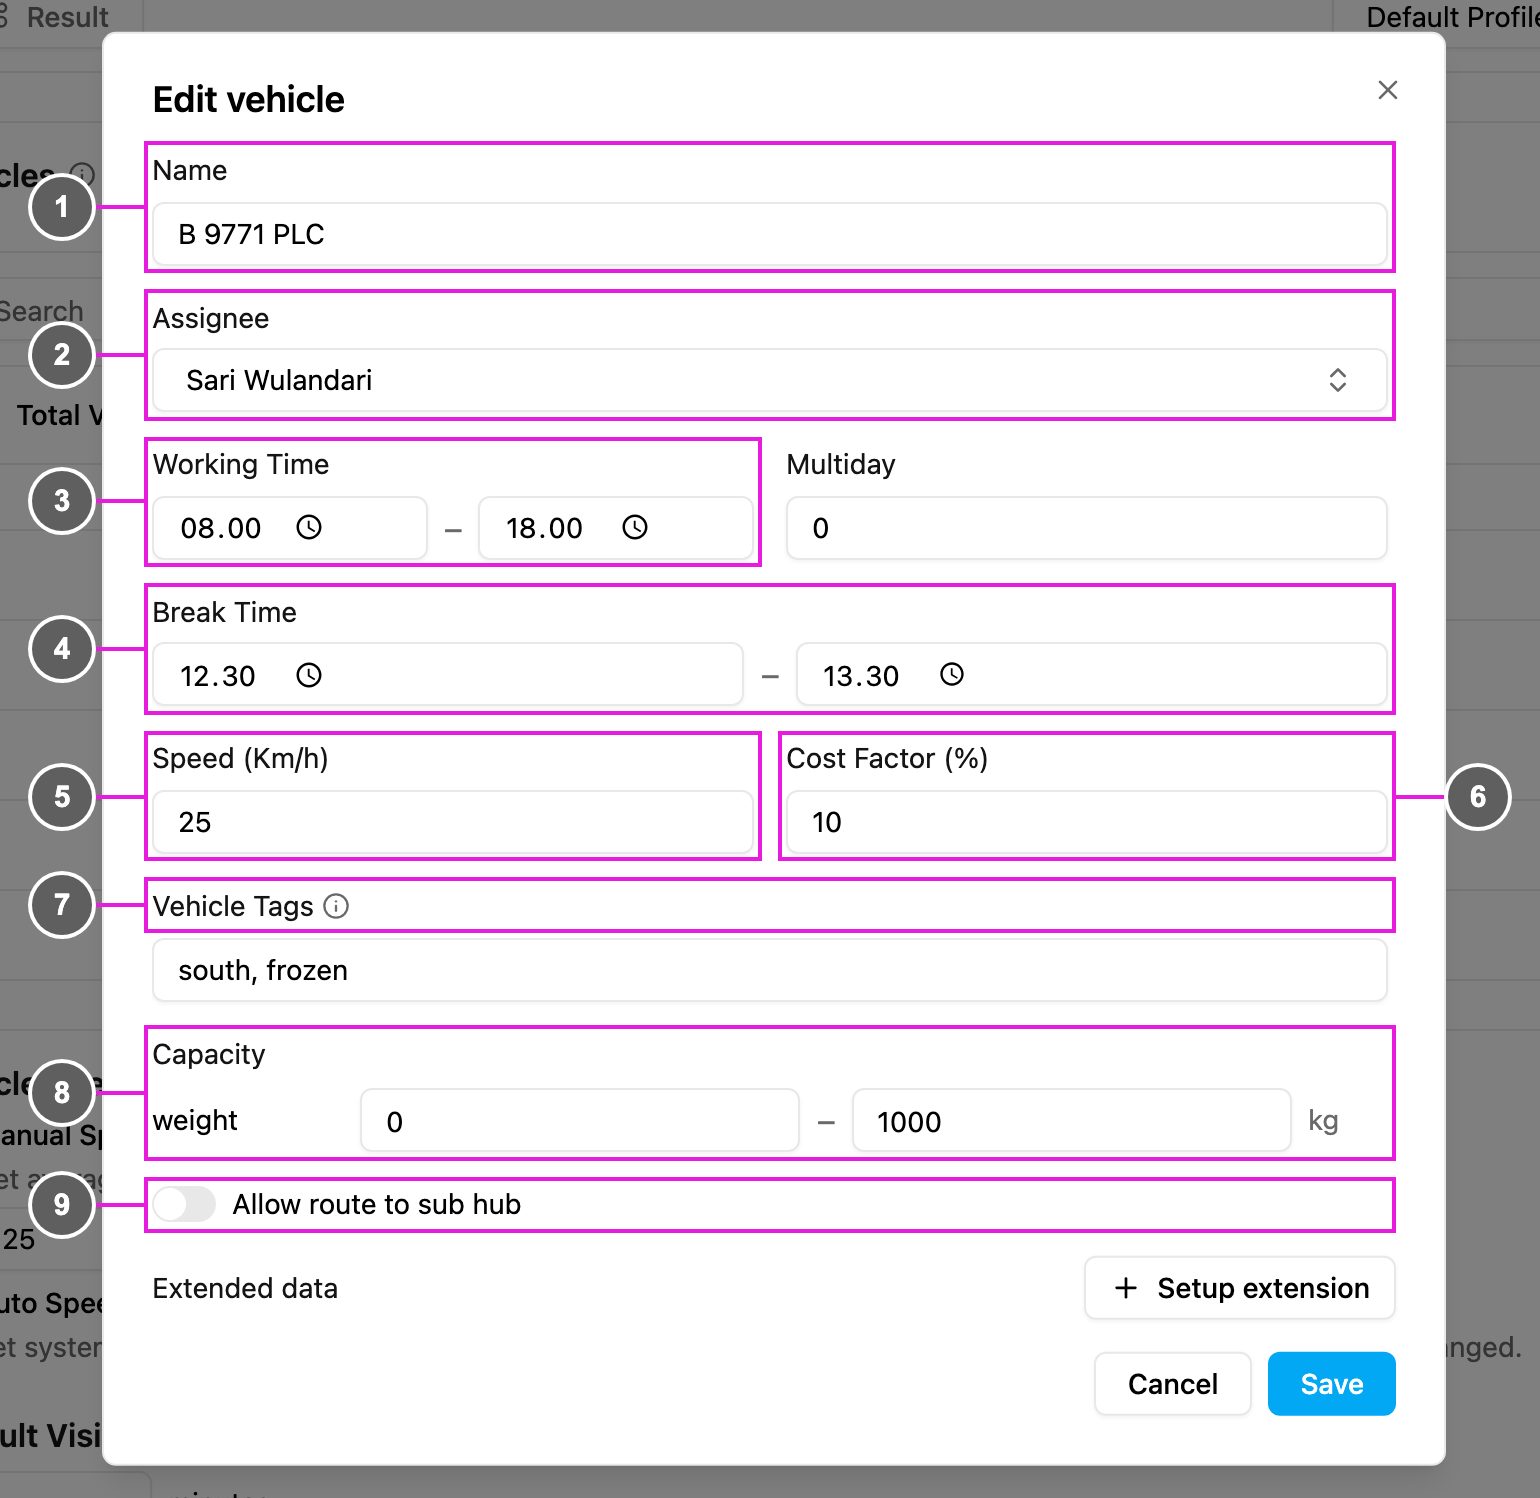
- Name: the vehicle name.
- Assignee: the driver.
- Working Time: the start and end of the working hours. Multiday is the number of extra days the working time runs over.
- Break Time: the start and end of the break.
- Speed (Km/h): from 5 to 99. When Auto Speed is on, the field is locked: Set by Auto Speed in this hub’s route configuration.
- Cost Factor (%): from 0 to 100.
- Vehicle Tags: up to 10 tags, separated by commas.
- Capacity: the minimum and maximum for each capacity constraint, here weight in kg.
- Allow route to sub hub: lets the vehicle carry visits to a sub hub, for Cross Docking.
Working time
The vehicle only serves visits inside its working time. When it is empty, the default is 08:00 to 17:00. The start must be earlier than the end, or the app asks you to fix it. If Return to Hub is on, the trip back to the hub must also fit inside the working time. To plan routes that span several days in one run, set Multiday (or Day) to the number of extra days. For example, working time 19:00 – 05:00 with Multiday1 means 7 PM to 5 AM the next day.
Break time
The break must be inside the working time, and its start must be earlier than its end. On a multi-day working time, the same break is taken every day: with working time 07:00 – 17:00 (+1 day) and break 12:00 – 13:00, the vehicle breaks from 12:00 to 13:00 on each day.Cost factor
The cost factor is a cost multiplier that sets which vehicles are used first. If vehicle A has cost factor1 and vehicle B has 10, using B counts as ten times more expensive than using A.
This is useful when you combine your own fleet with vendor vehicles: give your own vehicles a low cost (for example 0) and vendor vehicles a high one (for example 10), and the optimization fills your own vehicles first.
Vehicle tags
A visit can only go to a vehicle that has all of the visit’s tags. The vehicle may have more tags than the visit.
Common uses are road access (tag visits and vehicles small, medium or big by the road size) and dedicated vehicles (tag cash-on-delivery vehicles and visits COD).
Deleting vehicles
- One vehicle: click the delete icon in Action and confirm Delete this vehicle?. The vehicle is removed from the hub, so from every profile.
- Every vehicle: click Delete All and confirm Delete every vehicle in this hub?. All vehicles of the hub are permanently deleted, not just unselected. This cannot be undone.