

Required permission:
- View task (see the visits)
- Edit task (edit or delete a visit)
- Route optimization (click Optimize)
Visit page
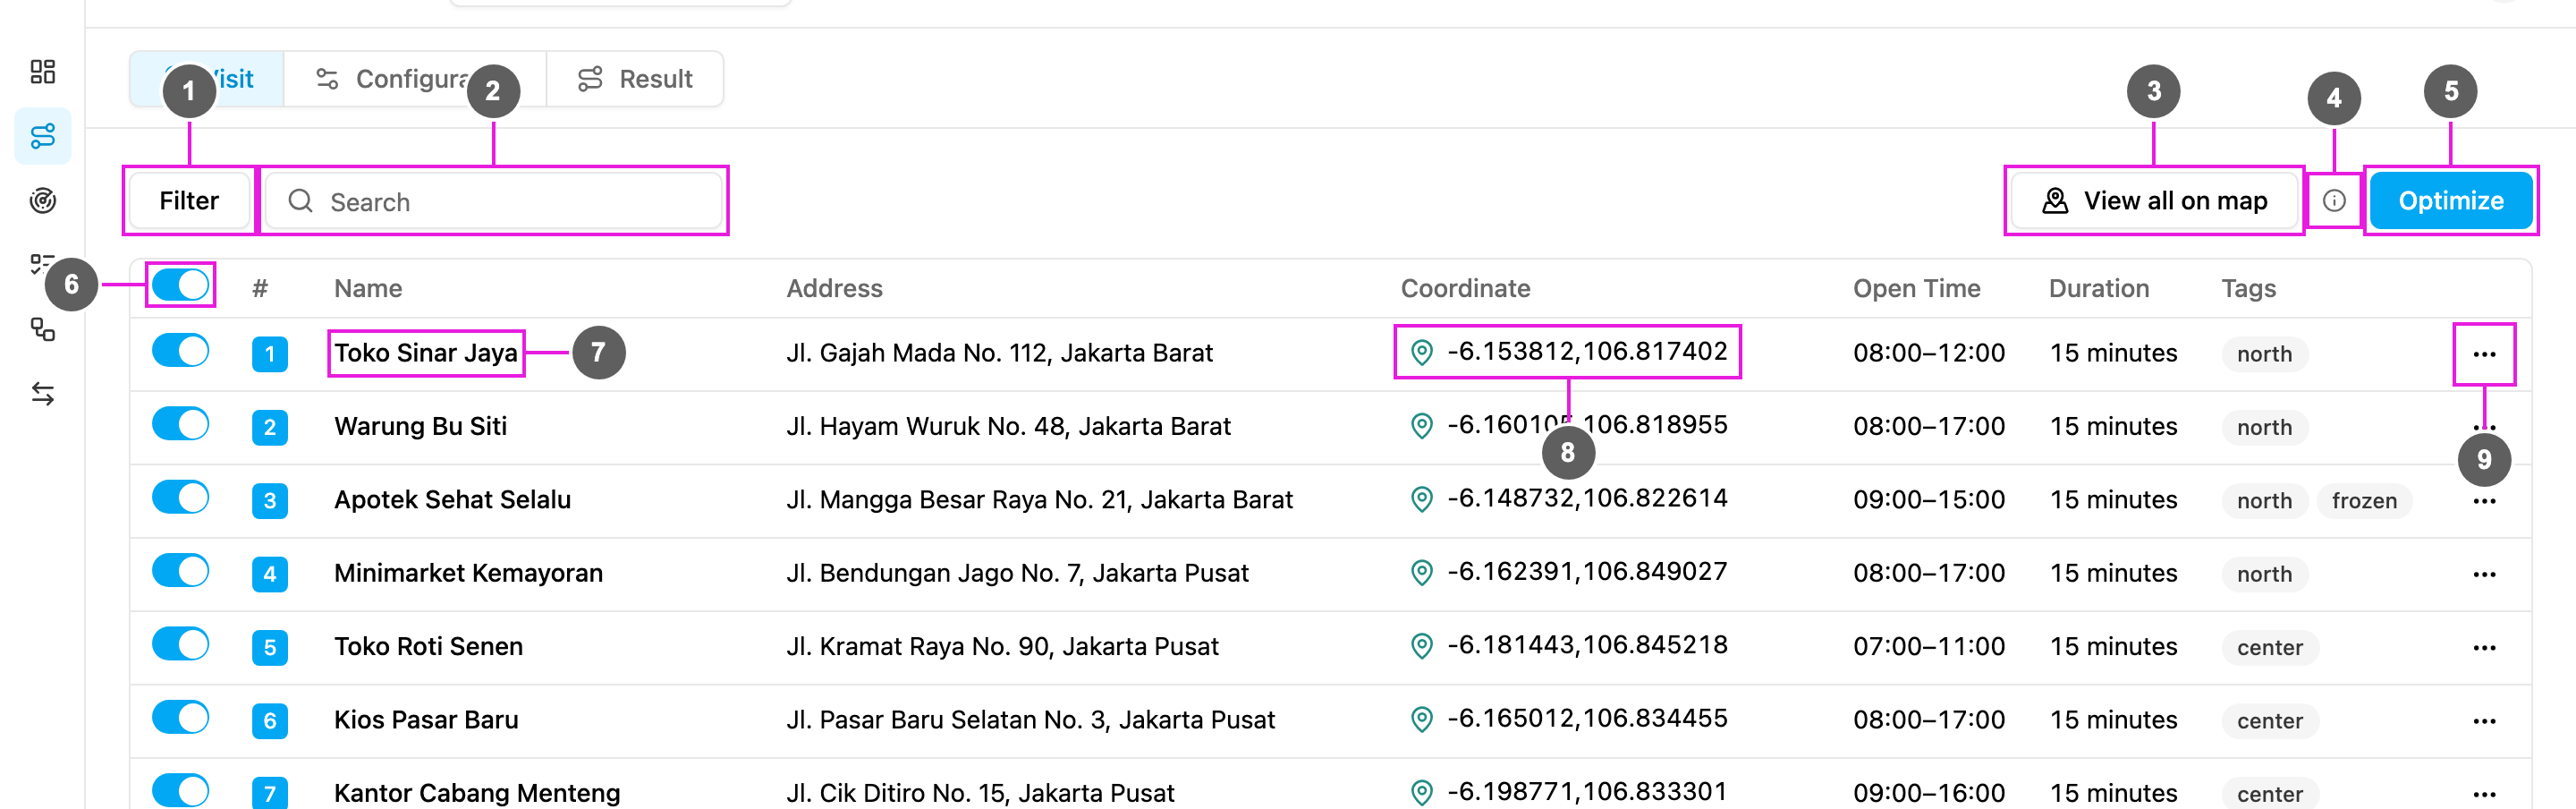
- Filter: narrow the list down. A number on the button shows how many filters are on. See Filtering visits.
- Search: find a visit by name or address.
- View all on map: open every visit on a map in a dialog. See Visits on the map.
- Active configuration: hover the info icon to see the configuration that the next run will use, with each option shown as on or off.
- Optimize: sends the switched-on visits and the vehicles of the active configuration to the optimization. Hover it to open the link to Configuration.
- Select all visits: include or exclude every visit at once. Each row also has its own switch. Only switched-on visits are sent to the optimization; the others stay in the list for a later run.
- Name: the visit’s name. The number on its left is the visit’s position in the list and its pin number on the map: blue when the visit is included, grey when it is switched off, red when it has no usable coordinate. When the name shows (Not set), the task type has no component mapped to Visit Name. Hover the info icon to open the task type and set it, or type a name in Edit Visit. A truck icon appears when the visit already belongs to a vehicle from an earlier run (see Dynamic routing); hover it to see the vehicle.
- Coordinate: the visit’s location, with a location pin that tells you whether the coordinate is usable.
- Actions (⋯): Edit Visit, Show on map and Delete visit.
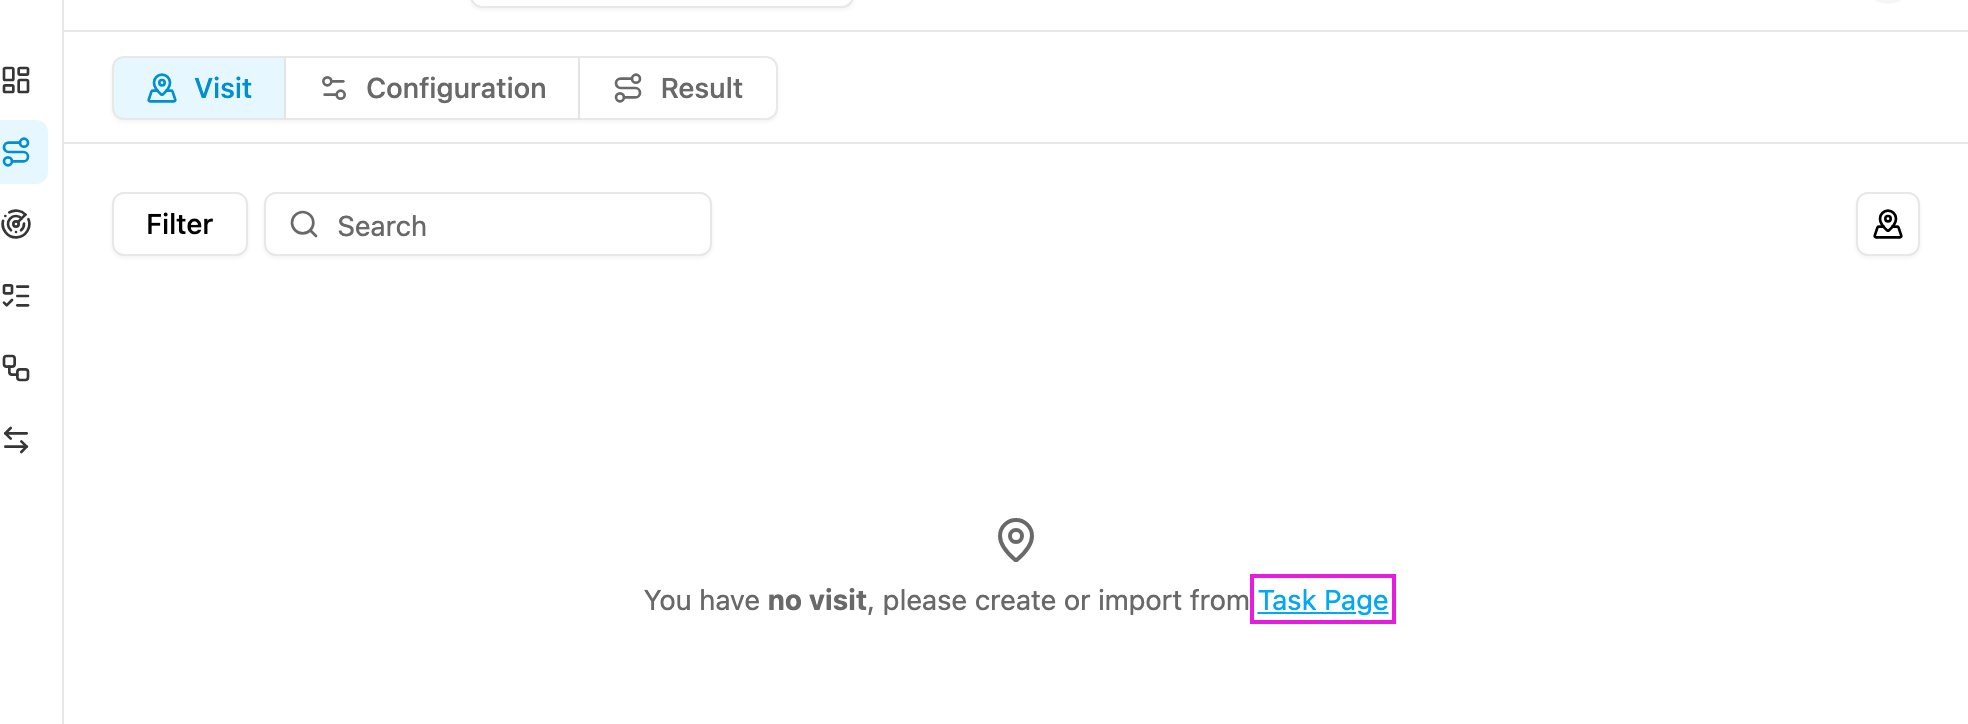
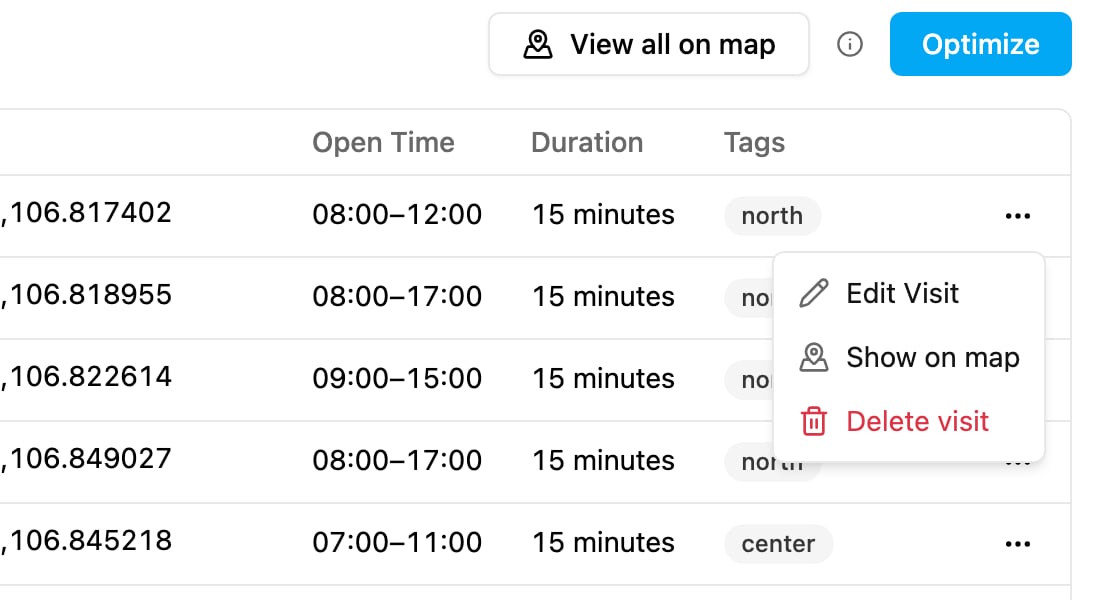
Location pin
The pin next to each coordinate tells you whether the visit has a usable coordinate:- Green: Location Success. The visit has a valid coordinate.
- Yellow: the coordinate was found from the address (with its accuracy), or Location Manually Set near Hub. Check it on the map.
- Spinning: Searching Location from the address.
- Red: Location Unidentified. The visit has no coordinate and the address could not be located, so it cannot be routed. Click the red pin and choose Set Manually to type a coordinate, or Auto Set Location to locate it from the address again. Rewriting the address in a clearer form also helps.
Date
When Odd Even is turned on in the active configuration, a Date field appears next to Optimize. Pick the day you are planning for: the optimization uses it to know whether that day is odd or even, so it applies the right plate restriction. See Odd Even.Filtering visits
Type in Search to find a visit by name or address. Click Filter to filter by: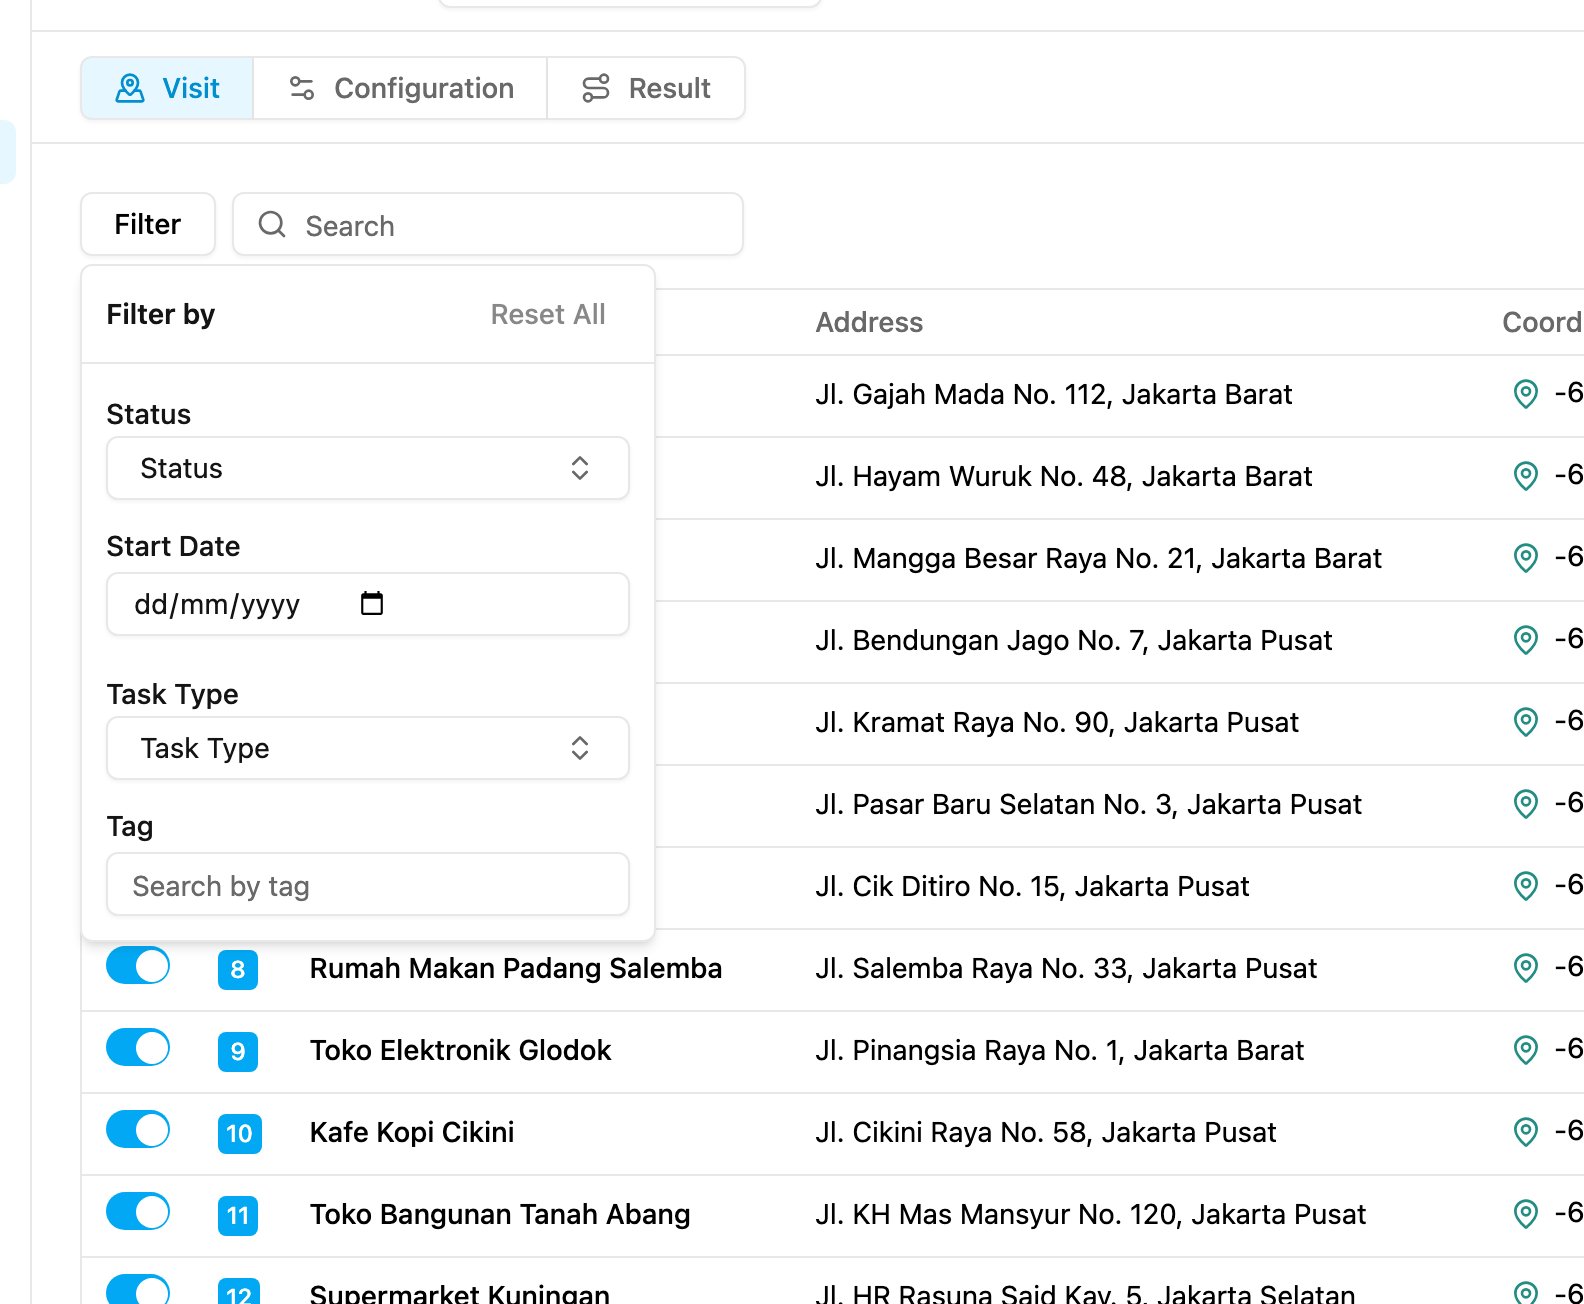
- Status: Unassigned or Ongoing.
- Start Date: the task’s start date.
- Task Type: the task types that have visits in the list.
- Tag: the visit tags.
Visits on the map
Click View all on map, or Show on map in a visit’s ⋯ menu, to open the map in a dialog.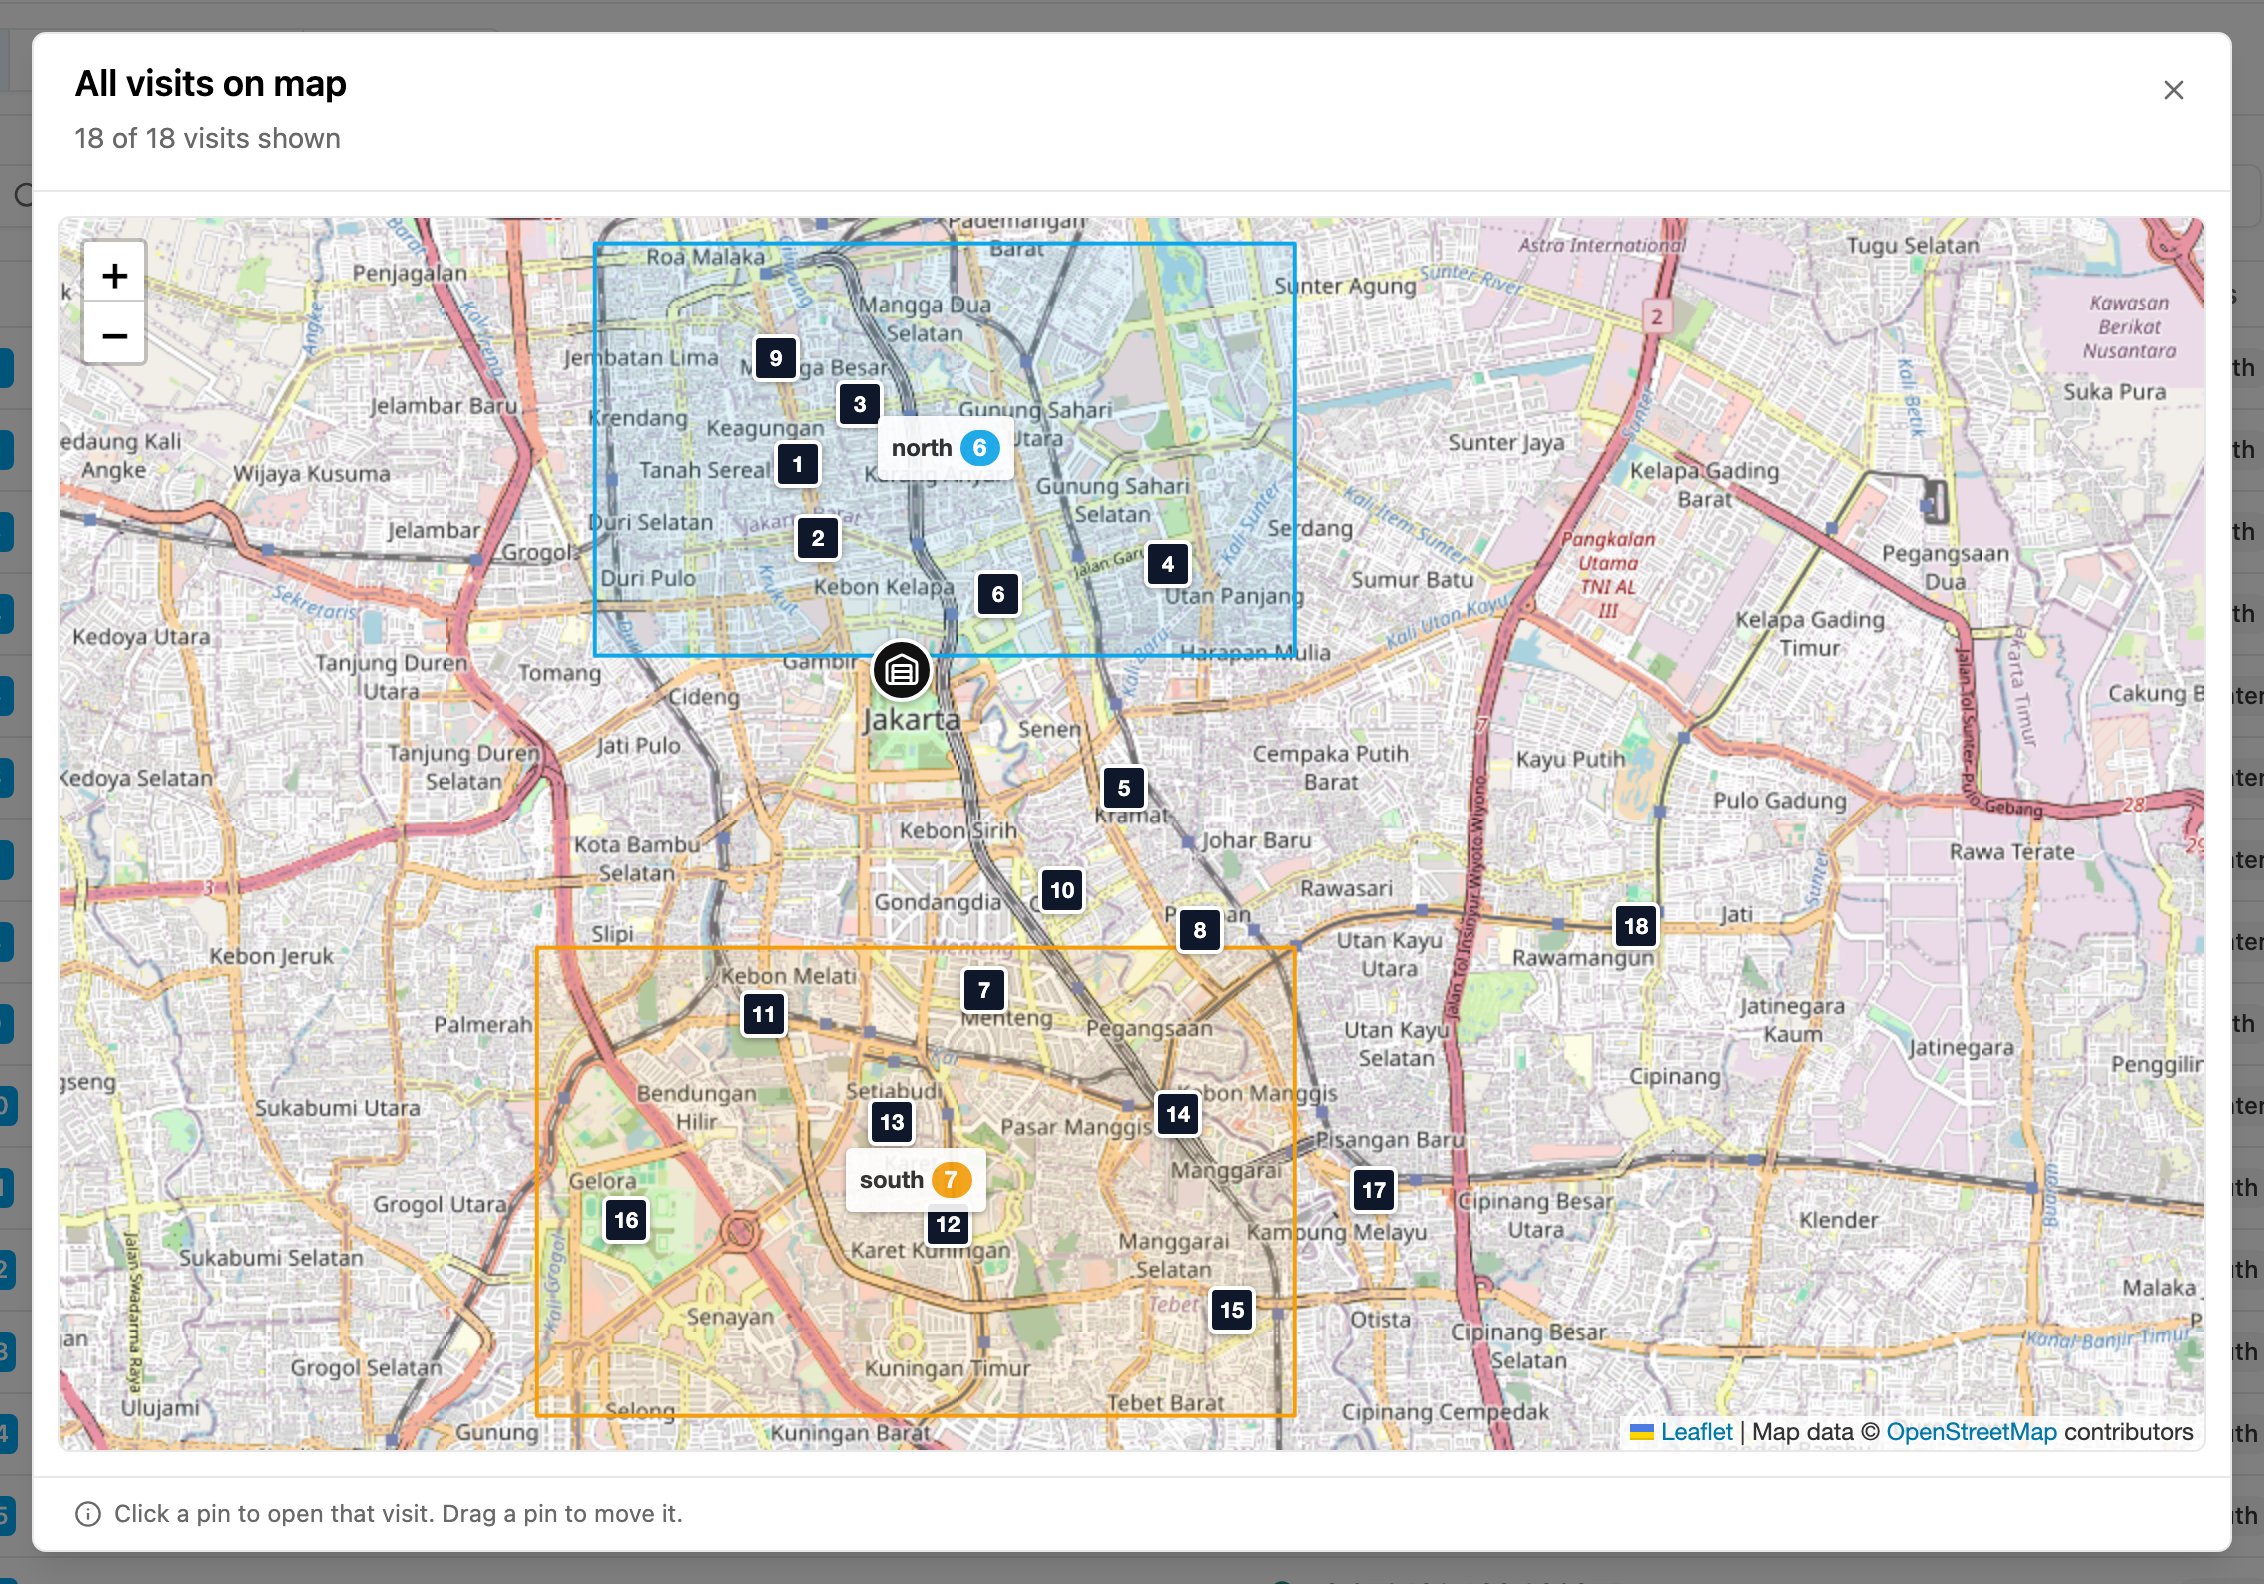
- All visits on map shows every visit as a numbered pin, with the hub as the building icon. Shaded areas are the geotagging zones switched on in the active profile, each with the number of visits inside it. The line under the title says how many visits are shown, for example 18 of 18 visits shown, how many have no location, and how many filters are on.
- Visit on map (from Show on map) zooms in on one visit and opens its popup.
- Click a pin to open the visit’s popup: its name and address, a switch to include or exclude it, arrows to step to the previous or next visit, and Edit to open Edit Visit.
- Drag a pin to move the visit. The app asks Move this visit? before it replaces the coordinate with the place you dropped it on. Click Cancel to put the pin back.
Editing a visit
Click ⋯ on a visit and choose Edit Visit, or click Edit in its map popup.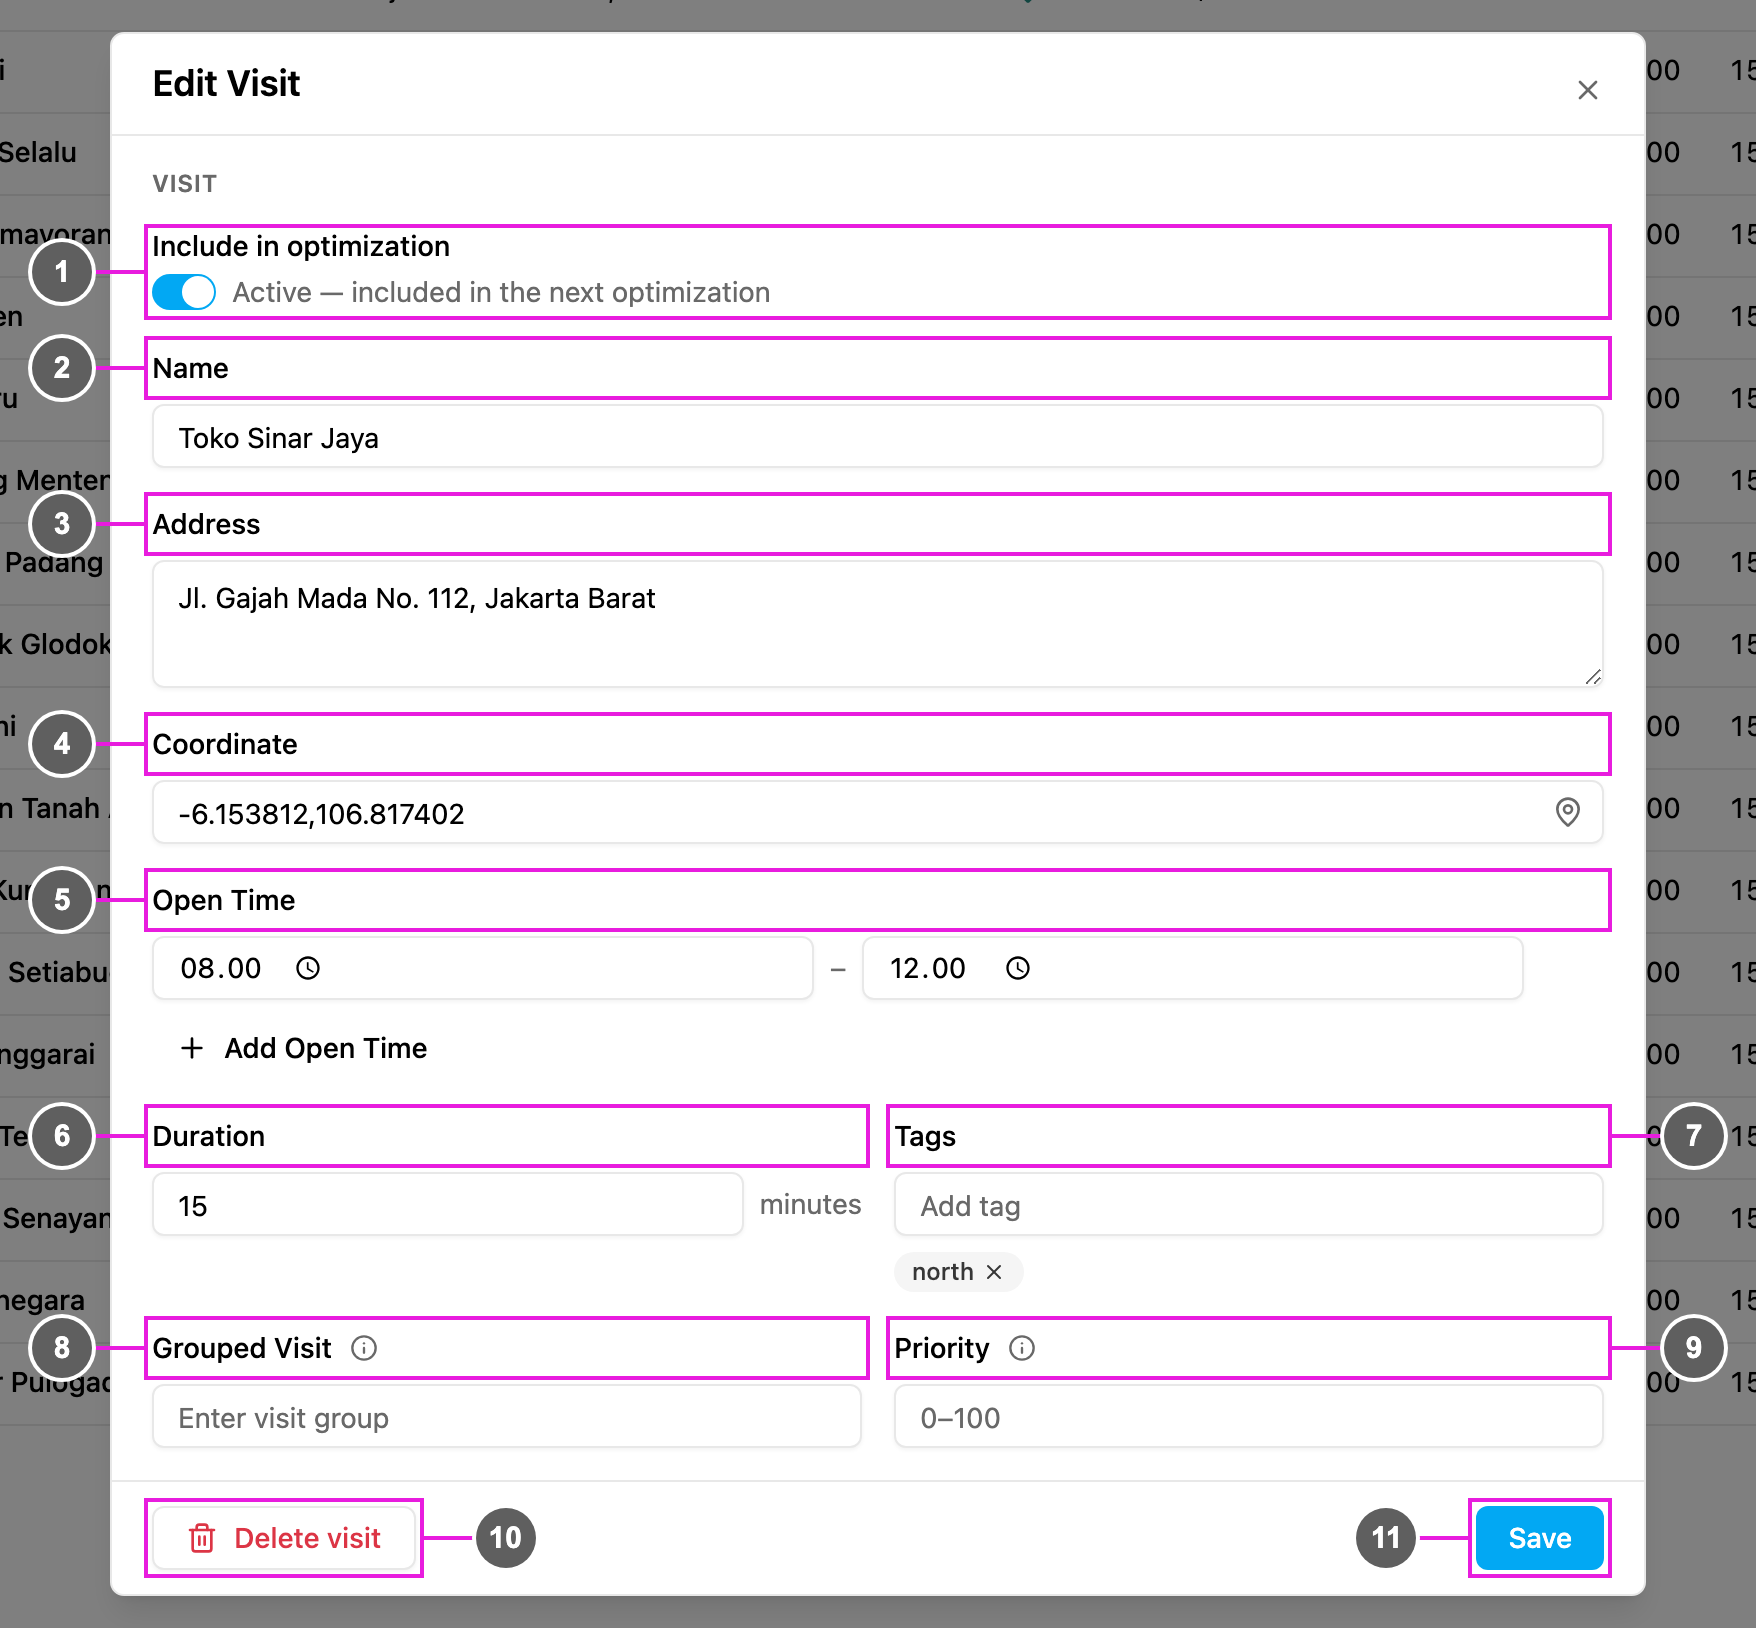
- Include in optimization: the same switch as on the row. Active means the visit goes into the next optimization.
- Name: the customer, receiver or store name. Required.
- Address: the full address. Keep it valid, so the app can locate the visit when it has no coordinate.
- Coordinate: the location, written as
latitude,longitude, for example-6.21462, 106.84513. - Open Time: when the place can be visited, for example 08:00 to 12:00. Click Add Open Time to add another window, for example when a store closes over lunch. The optimization only plans the visit inside these windows.
- Duration: the visit (unloading) time in minutes, the time spent at the location before leaving for the next stop. A whole number from 0 to 9999.
- Tags: the visit is only given to vehicles with all of its tags. Type a tag and press Enter; each tag shows as a chip you can remove with its ×. Up to 10 tags, and the same tag can’t be added twice.
- Grouped Visit: visits with the same group are given to the same vehicle. See Visit Group.
- Priority: the order of visits inside the same group, a whole number from 0 to 100 (0 by default). A lower number is visited earlier.
- Delete visit: delete the visit. See Deleting a visit.
- Save: keep your changes. The app confirms with Data name has been updated successfully.
Deleting a visit
Choose Delete visit in a visit’s ⋯ menu or in Edit Visit, and confirm Delete this visit?. Deleting a visit deletes its task, so the visit disappears from both the Task page and the Visit page. You can also delete the task from the Task page.Optimize
Choose the visits, check the active configuration, then click Optimize. The optimization runs in the background, so you can keep working. When it finishes, the new result opens in the Result tab. The optimization does not start when:- no visit is selected: Please select at least 1 (one) visit.
- none of the selected visits has a valid coordinate: Valid coordinate on visit is not found.
- the configuration has no vehicle switched on: No vehicle selected. Please go to the Configuration page to set up a vehicle.
- your plan does not include more optimizations: Your plan does not cover this optimisation. Please upgrade to continue.
- your plan’s route limit is reached: an Upgrade Plan dialog says You have reached your maximum route limit on your plan. Click Upgrade now to change plan, or contact your sales representative.